Sunday, October 20, 2013
Ready to Weigh
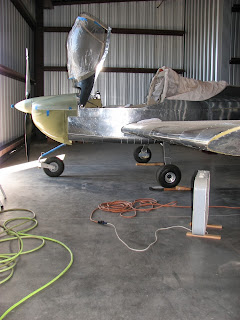
The plan for Saturday was to see that we get the plane onto some blocks (2" was suggested by Van's) and do the measurements for the Weight & Balance Worksheet once the plane had reached in-flight attitude.
While I was still fresh I put the top cowl on to see if I had reduced the build-up area enough to get a flush fit once the piano hinge would be in place.
The clearance to the lower cowl was good enough but the thickness still needed a bit of reduction in the center area. You can actually see some leftover from the build-up on the original fiberglass if you take a closer look.
So the cowl went off and back into the trunk to come back home.
Now, back to weighing preparations. To get the plane onto blocks without help, was a bit of a challenge which I tackled with some scrap wedges from building the loading ramps (which I never used).
The blocks are 2x4s which are not 2" thick but a tad less than 1.5". This was still too tall to get the canopy decks leveled. I needed to reduce the tire pressure of the main wheels down to 5 psi and increase the nose wheel pressure to 25psi to get it leveled. I will therefore use 1" blocks for the weighing.
Once it was leveled on the blocks the rest was fairly simple.
I dropped the plumb bobs and stretched some thread to mark the line between the points the bobs were indicating.
The rest was measuring and educated guessing (to find the center of the axles).
I used the angle to drop the center of the axle down to the tape measure.
Here are my values (which might differ from yours!):
D1: 24", D2: 39 7/8", D3: 23 15/16"
The plane came off the ramps and I made some notes about what ramps I will need to get the plane rolled onto the scales assuming I won't have a helper again.
Sunday morning I sanded down the thickness of the top cowl before heading out to the hangar.
Once out there I threw the top cowl back on and saw that the fit was good enough to now sand the patch down to allow for enough clearance to match drill into the piano hinge.
With the reduced thickness this want fairly quick and I set up the cowl for the drilling session.
Tape was applied to hold the cowl down as good as possible during the drilling.
I put all hinge pins in and also all screws to ensure proper alignment before starting to drill. I was afraid that getting the first hole in would possibly push back the hinge but it stayed in place well.
I took the cowl off and put it back in the trunk with the hinge still clecoed on. I will do the riveting in my shop at home, including the counter sinking.
The next big task was to install the rear window and check the clearance with the canopy. The latter turned out to be almost perfect. The right side of the canopy needed some sanding to be satisfactory and allow the canopy to latch.
Getting the screws through the rear window and into the roll bar turned out to be a rather lengthy task. I wanted to allow for enough clearance to the screw and opened up the holes a bit. Almost all the holes needed some work done and so I was not able to finish the task. Also, because of the fact that the #6 screws would not clear the pre-punched holes in the turtle deck skins. I will have to open them up a bit before I can install the screws with the nuts.
Next steps will be to finish the rear window installation and to check that the top cowl is finally back in operating condition. Then we will do another engine run and a taxi test and take the cowl off to check if the lifters are all happy. If so, that would then trigger me to schedule an appointment for inspection.
Unfortunately, the Copperstate Fly-In is going to interfere with my weekend working plans... We'll see how that works out.
Subscribe to:
Post Comments (Atom)


No comments:
Post a Comment