As I had just recently mentioned here, my build progress really feels like Van's keeps on issuing Service Bulletins whenever I made one or two steps ahead and pushes me back at least one step with this unplanned work creeping into my schedule.
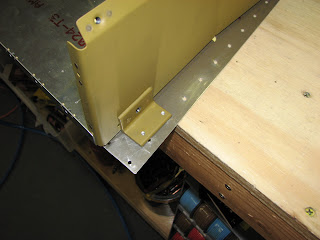
And to prove my point, they issued another SB this morning which will afefct what I am working on right now (Section 49, Cooling System). Apparently they found cracks in the base of the structure that holds the battery and the oil reservoir to the firewall. The weight of the filled oil tank and the vibration from the engine are obviously too much for this lightweight cube to take. I will have to install a reinforcement to the base but the lack of accessibility to do the measuring and the match-drilling will make this a very, VERY awkward task to perform.
I am glad that I did not install the oil hoses to the reservoir yet as this would have made the removal of the oil tank much harder.
Tonight I will take a closer look at that inboard part of the battery box and see if and how I could get a drill bit in that area.
Will this ever stop? I guess I have to look at the bright side and appreciate that I get to do this before it is actually flying and creating all the problems and damages to the structure but it seems hard to blind out the severe slipping of my build schedule.
Showing posts with label Section 29. Show all posts
Showing posts with label Section 29. Show all posts
Friday, April 5, 2013

Thursday, May 5, 2011
Section 29 on Halt
The battery and oil can box had to be built and put in place on the firewall. The part is really well designed and incredibly strong yet lightweight once installed.

It was a little hard to get at some of the rivets but the CQR solved all of these issues.
The next step was to seal all the rivets on the firewall and I wanted to also touch the spots where the firewall sealant didn't perfectly seal the FW. So I started with an inspection of the FW and see if there were any other issue before starting the sealing.
Well, I found some mystery holes that did get any rivets yet and I feel this might be in error. Look at this:

These are just 2 of 4 holes in the front of these stiffeners that didn't get a rivet yet. I wonder why and if I maybe overlooked the instruction that told me to rivets them? Any hints are appreciated!!!
Then I started the sealing job. MIxed about 50 grams of ProSeal (ended up using about 30 grams in 1.5 hours) and filled in one of my plastic syringes and started sealing everything. I know you can't really tell on the FW but I show it to you anyway.

It's much better to see on the canopy ribs.

On the left...

... and on the right side.
While the ProSeal was curing I continued to build by manufacturing the little bent strip that will act as a retainer for the piano hinges holding on to the cowl.

Then I had to start a dimpling spree dimpling every rivet attach and screw hole on the top panel skin and the little angles that will hold the actual panel in place.

Oh, and before the top skin was dimpled there was this ominous instruction telling me to work the front of the skin by hand to bend it down slightly so once screwed on it would tightly fit to the top firewall stiffener. I really did this, carefully pressing the front of the skin over the edge of my workbench, holding down the aft with my other hand.
It worked and gave the skin just a slight trend to bend down. I don't know if that is why it looks really good when I screwed it down on the plane.

Then I ran into a serious problem. Installing those angles on the top of the aft of the skin and riveting them on should be done while the skin was bent close to its final shape. I could rivet the nutplates onto the angles in the shop but then the final installation looked like I should do on the plane. With my work bench at its current height that would have been a hairy task and sounded like no fun and maybe even some messed up rivets.
The only safe way of doing it was to be inside the plane! Finally!!! The reason I was waiting for to actually sit in the plane!

Feels great! Roomy for one, that's for sure. Don't know about two big guys in there, though. Ah well, there's always a -10 I could build if I feel cramped, right?

Sitting in the plane wasn't enough. I even had to resort to desperate measures and swap back to the manual riveter as the pneumatic one was just to heavy to work upside down on this flimsy surface.

And there she is with the panel top skin on. Beautiful!

Now if I only had a SkyView on order to fill this void!
Well, and the SkyView is the reason why I cannot finish Section 29 at this point and why it is on halt now. The next steps would be to install the map box and the other panel elements. On the photos I've seen so far all 3 panel elements are changed from what I have, even the one that takes the map box. So, to not do unnecessary work, I will just stop here and declare the Fuselage Kit to be completed for now.
The next step would be either test fitting the wings in Section 30 or to start the wiring in Section 31. I think, I'll go with the latter and start to dig into the wiring. As my servos should soon be here, I can integrate their installation with the other wiring stuff.

It was a little hard to get at some of the rivets but the CQR solved all of these issues.
The next step was to seal all the rivets on the firewall and I wanted to also touch the spots where the firewall sealant didn't perfectly seal the FW. So I started with an inspection of the FW and see if there were any other issue before starting the sealing.
Well, I found some mystery holes that did get any rivets yet and I feel this might be in error. Look at this:

These are just 2 of 4 holes in the front of these stiffeners that didn't get a rivet yet. I wonder why and if I maybe overlooked the instruction that told me to rivets them? Any hints are appreciated!!!
Then I started the sealing job. MIxed about 50 grams of ProSeal (ended up using about 30 grams in 1.5 hours) and filled in one of my plastic syringes and started sealing everything. I know you can't really tell on the FW but I show it to you anyway.

It's much better to see on the canopy ribs.

On the left...

... and on the right side.
While the ProSeal was curing I continued to build by manufacturing the little bent strip that will act as a retainer for the piano hinges holding on to the cowl.

Then I had to start a dimpling spree dimpling every rivet attach and screw hole on the top panel skin and the little angles that will hold the actual panel in place.

Oh, and before the top skin was dimpled there was this ominous instruction telling me to work the front of the skin by hand to bend it down slightly so once screwed on it would tightly fit to the top firewall stiffener. I really did this, carefully pressing the front of the skin over the edge of my workbench, holding down the aft with my other hand.
It worked and gave the skin just a slight trend to bend down. I don't know if that is why it looks really good when I screwed it down on the plane.

Then I ran into a serious problem. Installing those angles on the top of the aft of the skin and riveting them on should be done while the skin was bent close to its final shape. I could rivet the nutplates onto the angles in the shop but then the final installation looked like I should do on the plane. With my work bench at its current height that would have been a hairy task and sounded like no fun and maybe even some messed up rivets.
The only safe way of doing it was to be inside the plane! Finally!!! The reason I was waiting for to actually sit in the plane!

Feels great! Roomy for one, that's for sure. Don't know about two big guys in there, though. Ah well, there's always a -10 I could build if I feel cramped, right?

Sitting in the plane wasn't enough. I even had to resort to desperate measures and swap back to the manual riveter as the pneumatic one was just to heavy to work upside down on this flimsy surface.

And there she is with the panel top skin on. Beautiful!

Now if I only had a SkyView on order to fill this void!
Well, and the SkyView is the reason why I cannot finish Section 29 at this point and why it is on halt now. The next steps would be to install the map box and the other panel elements. On the photos I've seen so far all 3 panel elements are changed from what I have, even the one that takes the map box. So, to not do unnecessary work, I will just stop here and declare the Fuselage Kit to be completed for now.
The next step would be either test fitting the wings in Section 30 or to start the wiring in Section 31. I think, I'll go with the latter and start to dig into the wiring. As my servos should soon be here, I can integrate their installation with the other wiring stuff.
Tuesday, May 3, 2011
Panel Base Installed
So today was the day of installing the panel base. Only a few more preparatory things had to get done. The canopy ribs needed their doublers, nutplates and angles riveted on. No biggy, you'd think. It still took me one and a half hour to get that done. Reason was that the parts had a tendency to not stay flush with the surface but to lean away as soon as they saw a riveter.
A lot of extra clamping and screwing screws into nutplates fixed that but also took away a lot of time.

The result's looking pretty fine though, I think.
The last step before the big panel installation was to match-drill the two angles to their respective holes with the panel base (and the longerons later). And you know by now that when I start like that there must have been something wrong with iy. And that's right.
Here you see the ribs clecoed to the base before match-drilling.

Everything aligned very easily and nicely.
After drilling however, the two angles look different:

This is the left side and the space around the freshly drilled holes looks sufficient.
On the right side it's easy to see how the holes are displaced and forward one is too close to the edge. Checking everything though shows that these angles are right where they are supposed to be and so are the ribs, there's nothing wrong with the base either and the angles length is identical and right down to specs.
I wonder if anybody else has seen this.
As everything was to specs I decided to assume that Van's knows about this and doesn't care and so I decided to follow their lead on this one and let it go.
Next steps were to "furnish" the empty panel base with steel doublers for the engine mount, some angles to route the wiring and the center frames for the center panel section. I left out the latter and installed the first two. Reason is that the panel frames stick out quite far and are just attached with two narrow seated rivets, having the potential to damage the panel base if caught by a tarp or similar. As I won't put the panel for a while as I'm waiting for the SkyView, I thought this to be the better option to hold off on these frames.
So I put the panel base on the longerons, clecoed everything else in place and started a little riveting frenzy. Soon thereafter the panel base looked like this:


Page 29-04 is almost completed, just need to seal the lower corner between the panel base and the canopy ribs with fuel tank sealant. At that time I will also touch up a few spots that I missed with the firewall sealant and complete that task as well.
I forgot to mention yesterday that I ordered two more kits for the -12. It's the wheel fairings although they are ridiculously expensive and the RV-12 AP SERVO KIT. I write this in all caps as this is the official name in Van's database and in case you want to order it as well. It's not officially available in the web store. It is the servo kit for the autopilot but without the AP74 unit that is only usable with the Dynon D180 FlightDek. As I am waiting for the SkyView, this unit will be obsolete and as it costs about 2/3 of the wheel fairings kit, it's not exactly cheap.
Now is the best time to install the servos for the autopilot though and I don't want to miss that opportunity of saving me some grief and back-pain.
A lot of extra clamping and screwing screws into nutplates fixed that but also took away a lot of time.

The result's looking pretty fine though, I think.
The last step before the big panel installation was to match-drill the two angles to their respective holes with the panel base (and the longerons later). And you know by now that when I start like that there must have been something wrong with iy. And that's right.
Here you see the ribs clecoed to the base before match-drilling.

Everything aligned very easily and nicely.
After drilling however, the two angles look different:

This is the left side and the space around the freshly drilled holes looks sufficient.

On the right side it's easy to see how the holes are displaced and forward one is too close to the edge. Checking everything though shows that these angles are right where they are supposed to be and so are the ribs, there's nothing wrong with the base either and the angles length is identical and right down to specs.
I wonder if anybody else has seen this.
As everything was to specs I decided to assume that Van's knows about this and doesn't care and so I decided to follow their lead on this one and let it go.
Next steps were to "furnish" the empty panel base with steel doublers for the engine mount, some angles to route the wiring and the center frames for the center panel section. I left out the latter and installed the first two. Reason is that the panel frames stick out quite far and are just attached with two narrow seated rivets, having the potential to damage the panel base if caught by a tarp or similar. As I won't put the panel for a while as I'm waiting for the SkyView, I thought this to be the better option to hold off on these frames.
So I put the panel base on the longerons, clecoed everything else in place and started a little riveting frenzy. Soon thereafter the panel base looked like this:


Page 29-04 is almost completed, just need to seal the lower corner between the panel base and the canopy ribs with fuel tank sealant. At that time I will also touch up a few spots that I missed with the firewall sealant and complete that task as well.
I forgot to mention yesterday that I ordered two more kits for the -12. It's the wheel fairings although they are ridiculously expensive and the RV-12 AP SERVO KIT. I write this in all caps as this is the official name in Van's database and in case you want to order it as well. It's not officially available in the web store. It is the servo kit for the autopilot but without the AP74 unit that is only usable with the Dynon D180 FlightDek. As I am waiting for the SkyView, this unit will be obsolete and as it costs about 2/3 of the wheel fairings kit, it's not exactly cheap.
Now is the best time to install the servos for the autopilot though and I don't want to miss that opportunity of saving me some grief and back-pain.
Monday, May 2, 2011
Panel Base Match-Drilled
The preparation from yesterday paid off. I prepped and primed the panel parts in the morning.

The photo also shows some older parts that had already been prepared.
I picked up the middle panel frames and added nutplates to them. The same I did with the panel base on the aft flange and on the web. I couldn't rivet the hinge angle to the canopy ribs yet as the primer needs to dry out completely before I want to do this.
The next step was possible to do without the canopy ribs finished and so I went ahead and match-drilled the panel base to the longerons. When fitting the panel base I noticed that it had a good fit on the firewall but was slightly wider than the longerons allowed for at the forward end of the canopy decks.
I had to spread the longerons a little, maybe 1/16", right at the aft end of the panel base before match-drilling was possible. In order to do that I cut a 2x2 to length to match with a spreader so it would fit right between the two longerons.

This shows the panel base half way through the match-drilling. The method worked very well and held up consistently during the job. Note that the most forward hole is so close to the firewall that is is hard to drill without marring the firewall. You could probably use the long drill bit but I don't like how it flexes and on such a delicate part as the longeron I rather have something with some more control. I used my recently acquired angle drill (remember? I needed it to fix a mistake I made with some nutplates down in the tunnel). Now it came in handy for this job and it worked very well!
I deburred the longerons (the two aft most holes on each side cannot get deburred though, due to lack of accessibility) and I cleaned of the amounts of Boelube I had used during the drilling.
Everything is ready to be put together and in place. All I'm waiting for is the primer to dry out.

The photo also shows some older parts that had already been prepared.
I picked up the middle panel frames and added nutplates to them. The same I did with the panel base on the aft flange and on the web. I couldn't rivet the hinge angle to the canopy ribs yet as the primer needs to dry out completely before I want to do this.
The next step was possible to do without the canopy ribs finished and so I went ahead and match-drilled the panel base to the longerons. When fitting the panel base I noticed that it had a good fit on the firewall but was slightly wider than the longerons allowed for at the forward end of the canopy decks.
I had to spread the longerons a little, maybe 1/16", right at the aft end of the panel base before match-drilling was possible. In order to do that I cut a 2x2 to length to match with a spreader so it would fit right between the two longerons.

This shows the panel base half way through the match-drilling. The method worked very well and held up consistently during the job. Note that the most forward hole is so close to the firewall that is is hard to drill without marring the firewall. You could probably use the long drill bit but I don't like how it flexes and on such a delicate part as the longeron I rather have something with some more control. I used my recently acquired angle drill (remember? I needed it to fix a mistake I made with some nutplates down in the tunnel). Now it came in handy for this job and it worked very well!
I deburred the longerons (the two aft most holes on each side cannot get deburred though, due to lack of accessibility) and I cleaned of the amounts of Boelube I had used during the drilling.
Everything is ready to be put together and in place. All I'm waiting for is the primer to dry out.
Sunday, May 1, 2011
Prep Work for the Panel Base
It's not just that this Influenza virus is still bothering me (it's just a week into it), no, it's also one of these invisible days. You feel like you worked on a lot of things, and they all needed their fair amount of attention and diligence but at the end of the day you can hardly see that you made any progress.
I'm on page 29-04 and preparing all the parts that will soon be combined to build the panel base. One of those little parts is made from aluminum angle and will later get attached to the gas strut that will hold the canopy. There are two identical parts to build from stock angle that Van's in there immeasurable wisdom have already cut to some 2" length that now has to be reduced to 1 5/8". Why they didn't cut to the required length to begin with when they cut it anyway will never come to light, I'm afraid.
I read ahead in Dave's Schmetterling Blog, so I knew that I had to take extra care not to mess up the drilling of these angles. For one because there's no spare piece in the kit and I would have to order replacements from Van's and wait for them to arrive, and then also because it's easy to drill along and then drift from the punched mark and ruin the piece in a heartbeat. So I followed Dave's advise not to drill the center 1/4" hole in one step but to drill a #40 pilot hole first.

Then I put the 1/4" drill bit in and final drilled the center hole on the drill press.

One angle piece was perfect the other one showed a slight drift in the center hole. I clecoed both pieces on their canopy ribs and also clecoed on the nutplate and drove a bolt in each one. The slight drift didn't matter. So, I have to say: Thank You, Dave!
Finally I countersunk the rivet attach holes and ended up with the final pieces.

I continued pulling parts for the panel base, deburring them, dimpling and counter-sinking the nutplate attach holes on all of them and when I was in the last steps before I wanted to quit anyway, it happened! I had just clecoed the gas strut angles and the hinge angles to the canopy ribs and was final drilling the nutplate bolt holes to 1/4" when I dropped any necessary caution and held the piece in my hand while drilling through the center hole. The best position for my hand to support it there was with the palm of my hand right behind the hole. DUH!

Not that the build hadn't drawn blood before, but not at that level of laceration combined with that much stupidity. Oh well, I was about done anyway because after deburring the parts, which I certainly did, they now have to get prepped and primed before I can rivet them together. Considering the chance that on a day like this where I try to drill a hole in my hand, I might just as well spray myself with the primer I postponed this activity till some other time.
I'm on page 29-04 and preparing all the parts that will soon be combined to build the panel base. One of those little parts is made from aluminum angle and will later get attached to the gas strut that will hold the canopy. There are two identical parts to build from stock angle that Van's in there immeasurable wisdom have already cut to some 2" length that now has to be reduced to 1 5/8". Why they didn't cut to the required length to begin with when they cut it anyway will never come to light, I'm afraid.
I read ahead in Dave's Schmetterling Blog, so I knew that I had to take extra care not to mess up the drilling of these angles. For one because there's no spare piece in the kit and I would have to order replacements from Van's and wait for them to arrive, and then also because it's easy to drill along and then drift from the punched mark and ruin the piece in a heartbeat. So I followed Dave's advise not to drill the center 1/4" hole in one step but to drill a #40 pilot hole first.

Then I put the 1/4" drill bit in and final drilled the center hole on the drill press.

One angle piece was perfect the other one showed a slight drift in the center hole. I clecoed both pieces on their canopy ribs and also clecoed on the nutplate and drove a bolt in each one. The slight drift didn't matter. So, I have to say: Thank You, Dave!
Finally I countersunk the rivet attach holes and ended up with the final pieces.

I continued pulling parts for the panel base, deburring them, dimpling and counter-sinking the nutplate attach holes on all of them and when I was in the last steps before I wanted to quit anyway, it happened! I had just clecoed the gas strut angles and the hinge angles to the canopy ribs and was final drilling the nutplate bolt holes to 1/4" when I dropped any necessary caution and held the piece in my hand while drilling through the center hole. The best position for my hand to support it there was with the palm of my hand right behind the hole. DUH!

Not that the build hadn't drawn blood before, but not at that level of laceration combined with that much stupidity. Oh well, I was about done anyway because after deburring the parts, which I certainly did, they now have to get prepped and primed before I can rivet them together. Considering the chance that on a day like this where I try to drill a hole in my hand, I might just as well spray myself with the primer I postponed this activity till some other time.
Saturday, April 30, 2011
Firewall Sealed Off
Part of section 29 is to seal off the perimeter of the firewall to the surrounding skins to keep away any fumes or dangerous carbon monoxide from the cockpit. This is what I did today, reluctantly. Still working on getting over the flu and the associated coughing and congestion is annoying enough. Wearing a respirator and trying to get into confined spaces while wearing it and trying not to gunk-up the pretty paint job with firewall sealant didn't really sound appealing to me.
It wasn't appealing but I did it anyway to get it over with.
First I turned the fuselage on its side. thanks to the rollbar this is a one-man job still, despite the really heavy structure.

Then I masked all the areas around where the sealant was supposed to go.

Then I cleaned the application area with alcohol to ensure good contact of the sealant. By the way, I learned that the firewall sealant is much thicker than the Pro-Seal stuff used to fuel proof the tank (and which was used in other areas to seal off the firewall). So it requires much more force to push that stuff out of the cartridge which can get a bit tiring. Particularly as you have to finish off the cartridge in one run once you mixed the components. It's all or nothing.

I added some drop catching paper layers before knowing that the stuff is so think I wouldn't have to worry about it dropping.
It also dried very quickly and became to hard to nicely spread it out with a popsicle stick, so I will just get the look as it applied right out of the cartridge. Not exactly what I had hoped for.
I am now waiting for the stuff to fully dry and will then take the masking tape off. An attempt to do it right after the application showed that it comes off from the electric tape easily but then still sticks to the main string, so I decided to wait until it's cured before removing the rest of the tape.
It wasn't appealing but I did it anyway to get it over with.
First I turned the fuselage on its side. thanks to the rollbar this is a one-man job still, despite the really heavy structure.

Then I masked all the areas around where the sealant was supposed to go.

Then I cleaned the application area with alcohol to ensure good contact of the sealant. By the way, I learned that the firewall sealant is much thicker than the Pro-Seal stuff used to fuel proof the tank (and which was used in other areas to seal off the firewall). So it requires much more force to push that stuff out of the cartridge which can get a bit tiring. Particularly as you have to finish off the cartridge in one run once you mixed the components. It's all or nothing.

I added some drop catching paper layers before knowing that the stuff is so think I wouldn't have to worry about it dropping.
It also dried very quickly and became to hard to nicely spread it out with a popsicle stick, so I will just get the look as it applied right out of the cartridge. Not exactly what I had hoped for.
I am now waiting for the stuff to fully dry and will then take the masking tape off. An attempt to do it right after the application showed that it comes off from the electric tape easily but then still sticks to the main string, so I decided to wait until it's cured before removing the rest of the tape.
Monday, April 25, 2011
Rollbar Painted - The Sequel
Despite me developing a full blow flu (in this temperature, go figure!) I was able to spray the other side of the rollbar and the reading light brace. The job turned out very nice again.

The scale has absolutely no meaning to this picture and shouldn't even be there. Please ignore it.
While I was feeling a bit better and waiting for the paint to cure I worked a little around the fuse, mixed some Pro-Seal and put the upper firewall onto the fuselage. I also match-drilled the little stub pieces of piano hinge and riveted them into place. I hope everyone at this step realizes that the upper screw hole for the nutplate that gets half riveted to the firewall and half to the side skin has to be dimpled for a #8 screw. If you riveted the stub hinges in place without doing this it's either drilling those rivets out again or dimpling the hard way by forcing the screw in. Not sure you like the looks of the later in such a prominent area.

The last thing I did before the flu took the best of me was to rivet the little diagonal stiffeners onto the side skin from the front inside area.

I took the photos tonight as I was just too exhausted this afternoon to do anything but lying down.
The next steps are messy and require firewall sealant to get spread around to seal off the cabin from possible fumes in front of the firewall. In my current condition I better hold off on that one until I feel better.
Maybe I can do some light riveting job with the rollbar while I'm forced to be at home...

The scale has absolutely no meaning to this picture and shouldn't even be there. Please ignore it.
While I was feeling a bit better and waiting for the paint to cure I worked a little around the fuse, mixed some Pro-Seal and put the upper firewall onto the fuselage. I also match-drilled the little stub pieces of piano hinge and riveted them into place. I hope everyone at this step realizes that the upper screw hole for the nutplate that gets half riveted to the firewall and half to the side skin has to be dimpled for a #8 screw. If you riveted the stub hinges in place without doing this it's either drilling those rivets out again or dimpling the hard way by forcing the screw in. Not sure you like the looks of the later in such a prominent area.

The last thing I did before the flu took the best of me was to rivet the little diagonal stiffeners onto the side skin from the front inside area.

I took the photos tonight as I was just too exhausted this afternoon to do anything but lying down.
The next steps are messy and require firewall sealant to get spread around to seal off the cabin from possible fumes in front of the firewall. In my current condition I better hold off on that one until I feel better.
Maybe I can do some light riveting job with the rollbar while I'm forced to be at home...
Sunday, April 24, 2011
Rollbar Painted Part 1
Early in the morning I prepared the parts for painting. The primer had dried nicely and the surfaces were quite smooth. To remove minor imperfections I sanded them with a maroon SB pad and then started the painting. Paint use anticipation was dead on and while the parts were curing I worked on section 29.
Most of the dimpling of that strip that goes on top of the FW I had done yesterday so now it was to rivet the nutplates and the strip in place. That went relatively easy although slow. A lot of care had to be taken to get those rivets in and the overlapping skins flat. Some of these needed the screw to go into the nutplate to hold everything down and in place.

Then the piano hinges for the cowl had to be match drilled. If you haven't cut them to length yet, make a note for 1201J, the longer one of the two hinges. The manual asks for it to be cut to 25.5" length. That is incorrect. It needs to be 26" long with the loop starting on the lower left side of the FW and that flat side in that little cutout area where the hinge pin ends will be stored.
How I know? Look at this:

I had to drill an extra holes to rivet down the end of the piano hinge and will have to fill the unused hole with a rivet.I believe the page where this incorrect length was mentioned had a revision number. Stuff like that just makes me angry. The drawing is incorrect either as it shows two loops on each end which is not would you need to do here to get the hinge over that hole.
After match-drilling and the deburring the holes had to get countersunk for AD3 rivets.

And then the hinges were riveted in.

And finally the rest of the vertically mounted nutplates were riveted in and the antenna platform was riveted on.

Then it was time to get the parts out of the paint booth and put them in the shop for the night.

They turned out nice, tomorrow the opposite side will get painted.
Most of the dimpling of that strip that goes on top of the FW I had done yesterday so now it was to rivet the nutplates and the strip in place. That went relatively easy although slow. A lot of care had to be taken to get those rivets in and the overlapping skins flat. Some of these needed the screw to go into the nutplate to hold everything down and in place.

Then the piano hinges for the cowl had to be match drilled. If you haven't cut them to length yet, make a note for 1201J, the longer one of the two hinges. The manual asks for it to be cut to 25.5" length. That is incorrect. It needs to be 26" long with the loop starting on the lower left side of the FW and that flat side in that little cutout area where the hinge pin ends will be stored.
How I know? Look at this:

I had to drill an extra holes to rivet down the end of the piano hinge and will have to fill the unused hole with a rivet.I believe the page where this incorrect length was mentioned had a revision number. Stuff like that just makes me angry. The drawing is incorrect either as it shows two loops on each end which is not would you need to do here to get the hinge over that hole.
After match-drilling and the deburring the holes had to get countersunk for AD3 rivets.

And then the hinges were riveted in.

And finally the rest of the vertically mounted nutplates were riveted in and the antenna platform was riveted on.

Then it was time to get the parts out of the paint booth and put them in the shop for the night.

They turned out nice, tomorrow the opposite side will get painted.
Saturday, April 23, 2011
Lots of Invisible Things
That's what I did today. Despite a cold I developed just after the end of the work week yesterday, I spent a lot of hours in the shop today. You can hardly see what I did. Among the more visible things is the priming for the paint job coming up tomorrow morning. Then I screwed and torqued the rollbar bases back on and lacquer sealed them. I also prepared a lot of parts in the forward upper fuselage section 29, so I can work on that while waiting for the paint to cure tomorrow.
Dimpled the upper firewall and the little aluminum strip that will hold the cowl hinges, countersunk the nutplate attach holes, deburred everything and pulled additional parts that will need surface treatment and priming.
No photos, sorry. More tomorrow.
Dimpled the upper firewall and the little aluminum strip that will hold the cowl hinges, countersunk the nutplate attach holes, deburred everything and pulled additional parts that will need surface treatment and priming.
No photos, sorry. More tomorrow.
Tuesday, April 19, 2011
Rollbar Continued
I didn't know how to describe the progress from today as it partly depends on how I am going to continue tomorrow evening. When I came home I started doing some supplementary jobs while waiting for my wife to come home to help me with the rollbar.
Among those jobs was a little counter sinking and nutplate riveting on the bracket that will hold the fuel tank in place as well as dimpling all the nutplate attach holes of the aft bulkhead that will close up the tailcone to the fuselage. Forgot to take a photo there but it's not that big of a task, is it.
I also started spraying the parts for the oil reservoir and the battery and the little platform for the GPS antenna with engine enamel.
Then when my wife came home, we immediately started working on sliding the aft half of the rollbar onto the bases again. That went pretty well as we had done it yesterday as a trial run. The next step was to now take the front half and get this one on as well. That was a bit more tricky - as expected, but we managed to finally get it on with a little tweaking and pushing.

Everything was clecoed into place and now the big question is how to continue?
I could rivet half of the holes inside and out and leave the rest clecoed before match-drilling, or I could rivet all of it and hope that I somehow will be able to get it off for deburring and then back on, or I could fill the rest of the holes with clecos as well, delay the riveting and match-drill now. The big advantage of the latter would be that if there was any trouble sliding it off or back on, I could take the clecos out and just do it like we did tonight. I'm afraid that the riveting will put so much tension on the bases that I might be able to get the rollbar off but maybe not so easily back on.
The structure just clecoed as it is in the photo above is very rigid, stiff and strong, so I'm not worried about the match-drilling being off if I just held it together with clecos.
So I lean towards that no-rivet option right now. Any comments from the educated crowd?
While I was thinking about the best way to do this I kept my hands busy by trial fitting those little struts that will go in front of the rollbar and connect it to the canopy deck. Looks like the fit is pretty good.

It was getting late, so I turned the previously sprayed parts over and sprayed the other side for the parts to completely dry over night. I peeked through "door" of the paint booth to take this sneak peak shot.

My favorite color red was out of stock ...
Addendum: Thinking about my thoughts from last night again I found a problem with them this morning. While it might be better to not rivet the structure before match-drilling for easier removal, it doesn't really help at all when painting it. My intention was to paint it before final installation and riveting it to the base blocks. Without rivets in them this is not going to be doable. I'll have to think more about this ...
Among those jobs was a little counter sinking and nutplate riveting on the bracket that will hold the fuel tank in place as well as dimpling all the nutplate attach holes of the aft bulkhead that will close up the tailcone to the fuselage. Forgot to take a photo there but it's not that big of a task, is it.
I also started spraying the parts for the oil reservoir and the battery and the little platform for the GPS antenna with engine enamel.
Then when my wife came home, we immediately started working on sliding the aft half of the rollbar onto the bases again. That went pretty well as we had done it yesterday as a trial run. The next step was to now take the front half and get this one on as well. That was a bit more tricky - as expected, but we managed to finally get it on with a little tweaking and pushing.

Everything was clecoed into place and now the big question is how to continue?
I could rivet half of the holes inside and out and leave the rest clecoed before match-drilling, or I could rivet all of it and hope that I somehow will be able to get it off for deburring and then back on, or I could fill the rest of the holes with clecos as well, delay the riveting and match-drill now. The big advantage of the latter would be that if there was any trouble sliding it off or back on, I could take the clecos out and just do it like we did tonight. I'm afraid that the riveting will put so much tension on the bases that I might be able to get the rollbar off but maybe not so easily back on.
The structure just clecoed as it is in the photo above is very rigid, stiff and strong, so I'm not worried about the match-drilling being off if I just held it together with clecos.
So I lean towards that no-rivet option right now. Any comments from the educated crowd?
While I was thinking about the best way to do this I kept my hands busy by trial fitting those little struts that will go in front of the rollbar and connect it to the canopy deck. Looks like the fit is pretty good.

It was getting late, so I turned the previously sprayed parts over and sprayed the other side for the parts to completely dry over night. I peeked through "door" of the paint booth to take this sneak peak shot.

My favorite color red was out of stock ...
Addendum: Thinking about my thoughts from last night again I found a problem with them this morning. While it might be better to not rivet the structure before match-drilling for easier removal, it doesn't really help at all when painting it. My intention was to paint it before final installation and riveting it to the base blocks. Without rivets in them this is not going to be doable. I'll have to think more about this ...
Subscribe to:
Posts (Atom)


