Showing posts with label Fixing Bugs. Show all posts

Sunday, January 5, 2014

Climb Data Collected

Another take-off confirmed that the RPM indicator is still somewhat jumpy on take-off and initial climb-out. It seems to jump between two discrete values and is much more stable than before. Surprisingly enough, the indicator is rock solid as soon as the initial climb-out is done. Subsequent climb-outs work work just fine and show a constant RPM. I can absolutely live with this until I remove the cowl anyway for some other reason. Then I would try a 30K resistor instead of the 20K one and see if this would completely solve the problem.

I have also alleviated the roll problem by extending the pushrod for the right flaperon by one turn of the attached fitting. To get there I had to remove my split floor panel and squeeze my hand in there but it only took an hour to complete the task. If I ever have to open the floor panels again, I might add another half turn as there is still a very slight roll tendency left.

After doing this fix, I wanted to fly to confirm that the airframe was still balanced and to collect some climb data and do some speed boxes.

I did all that but the really impressive thing was the shot I took once I got to 9000 feet.


Both have been taken north of El Tiro Gliderport at about 9000 feet. Breath-taking!

Overall, the data suggests that my propeller is a bit too high in pitch. I was not able to get to 5500 RPM in straight and level flight at density altitude of 7500 feet.
So, I might have to do this before the next flight and then verify that I am doing better. By the way, the left EGT sensor was working ok during the flight and did not vary too much but after I had hangared the plane again and let it cool down the SV showed a cross in place of the left EGT temperature. That usually means that the sensor is dead or not connected. Oh well, there is always something, I guess ...

A New Problem

I went to the hangar early as I had to remove the upper cowl and work on the RPM wiring. When the cowl was off I could also verify that the electronic ignition modules had not been exposed to excessive heat so far (this will change in the summer, I suppose).


So far I have always opened the oil door soon after turning off the engine and left it open to allow the hot air to escape. I was also careful to get the cowl out of direct sunlight when the engine was hot. All this might have helped keeping the temps down a bit.

Concerning the RPM wiring, I had prepared a 20K Ohms resistor with spade connectors to allow it to be inserted and replaced if necessary. The following picture shows the wiring you would want to work on. The black wire is ground and the white/green one carries the signal (and would get spliced for the resistor).


I spliced the white/green wire and added spade connectors at its ends and inserted the resistor. The resistor is covered with shrink tubing that connects to the spade connectors in order to reduce stress and vibration (and dirt).


With this fix installed I did a ground engine run with the cowl still open. The RPM was steady within the limited range of RPM I could produce on the ground. The static WOT run showed 4920 on the first attempt and 5000 RPM on the second. I could only verify in the air if this resistor fixed the problem, so I put the upper cowl back on and took off.

During take-off and climb out I still experienced somewhat jump RPM readings but as bad as it used to be. After throttling back the RPM was rock solid and I continued flying around 5300 for a few minutes before I leveled off and let the autopilot take over to maintain altitude. I open up the throttle to maximum again and saw steady 5520 RPM. I even descended a few thousand feet after this and did another WOT climb at 75 knots without any jump RPM readings.

I will see today if this fix solved the problem completely when taking off again and doing the climb rate evaluation test (which requires extended WOT climbs) and the speed test box at 5500 RPM.

Now what is the new problem? During the ground run with the cowl open and the subsequent flight I experienced very jumpy and fluctuating readings in the left EGT sensor. The right one was rock solid but the left one almost never settled and even dropped off the SkyView a few times. This might indicate that the sensor is dying or the wiring has broken. Thankfully, this sensor has practically no value as its only real use would be during mixture changes of the engine but the Rotax does not allow for manual mixture changes. I will watch this for a while and then decide if and what to do about it. This is certainly nothing that would keep me from completing the test phase.

Saturday, December 28, 2013

She's Flying Again

After closing everything up yesterday and doing a successful engine ground run with some time at WOT with pleasing fuel pressure and flow indications, I did a 50 minutes test flight today.
I can say it feels good to be flying again and the fuel supply did not show any issues whatsoever.
The only problem that is left is the erratic RPM readings once I reach 5100 RPM. Obviously my attempted fix in securing the plug that connects the avionics to the cable coming from the Rotax did not solve the problem. I will have to dig into that at some point but don't see the need for it right now.
Currently I am more hampered by the small test flight area of just 25nm around my home airport. At 110 knots you reach the edge of the area pretty quickly! The following pictures shows the North North-West edge of that area.


and the Skyview at the same location, showing 117 knots TAS at 4900 feet and at only 5070 RPM. This plane is really fast, and I haven't even installed the wheel and leg fairings yet!


Now I have to read into the flight testing exercises and get to it!

Thursday, December 26, 2013

It Was The Pump, And The Pump Alone!

Today I put the new fuel pump in and hooked it back up to the lines. I didn't tie it down all the way and used clecos to hold the shelf down for a first trial run.


I filled another gallon of gas into the tank, opened the valve and flipped the switch. Whoosh! A strong stream of gas was rushing into the canister underneath the gascolator. What a beautiful sight! No hesitation, no fuzz, just pure gas and a lot of it.

The 1-gallon drain test was done in around 120 seconds. It ended so abruptly that I had a hard time finding the stop button on the watch (or the cell phone for that matter).

I checked the pump fittings and found no leaks and finalized the pump installation, riveting the shelf back to the belly skin and reconnected the pushrods to the torque tubes.


Then I closed up the panels in the baggage area and put the seats back in.


What is left is to close up the belly access panels and then reinstall the cowls. A ground test run will follow and then ... maybe some flying!

Wednesday, December 25, 2013

Bad Fuel Pump

So I got an early Christmas gift a few days ago when I was out at the hangar again. The task was to determine a bit further if the fuel pump had an issue or not. I had made some flared tube stubs that would allow me to hook up tubes to the pump while it was in the fuselage and pump some gas in a closed circle - just to see how the pump rate was.
Before I attached these stubs, I decided to remove the inlet fitting after fishing in there with a tiny hook and finding some small pieces of unidentifiable debris.


What I found was traces of rust on the inside of the fitting. I grabbed my inspection camera and got a photo of the inlet side of the pump.

The shots taken from the screen of the camera are a bit blurry but I think you can still see the problem clearly enough,


Where did the rust come from? Well, I thought of the best way a while back to pressure test the fuel system before putting gas in it. Back then I decided to use distilled water which I tried to vacate after the test using pressurized air. Obviously this was not enough to get it out or maybe it just wasn't a good idea to put it in there to begin with. Either way, the pump had to come out.

Before doing that (which I deemed a multiple days job) I wanted to see if the pump really was the problem for limiting the flow in the fuel system and so I hooked up the tube stubs (after tightening the fitting again) and attached some PVC hoses to pump gas around in a jerry can.
Well, the result was inconclusive. The pump does slightly restrict the flow when blowing into it from the intake side but not enough to cause such a restricted flow as I had seen when doing the last-gallon test. When pumping real gas, it did do a pretty decent job in my eyes. It showed much more flow than I had seen during the last-gallon test. But then, I had also messed with the system since then quite significantly, so maybe the problem had disappeared or at least was mitigated at this point? I also do not remember seeing any problems during the First Flight and I did pretty much the same long and steep climb out at WOT as I did on the second flight when I saw the flow/pressure problem.
While the pump definitely has to be replaced because of the obvious rust problem, it is not yet clear to me that the pump was the only cause for the problem I had seen. There still could be something wrong with the tank as well.
For now I had to take the fuel pump out though and that was something I had not looked forward to at all. Before ripping everything apart I wanted to give it a serious try to remove it without further unscrewing of bulkheads and seat pans and such.

I drilled out the 4 rivets on the belly to get the shelf loose to which the pump is screwed on to. This was necessary as the pushrods prevent a direct access to the AN4 bolts that hold the pump to shelf and I did not have any tools to work around the rods. With shelf loose I could move sideways just enough to get a socket to them to remove them. With the pump disconnected from any mechanical restraints, it was fairly easy to detach the electrical connection as well. The pushrods were detached at their aft connection point to the torque tubes so I was able to spread them easily and with the pump being moved aft I was able to get it out by turbing it 90 degress while pulling it up and away from the tunnel. The distance from the flange on the bottom to the intake and outlet fittings is just enough to clear the pushrods with a 90 degree turn and then it was free.
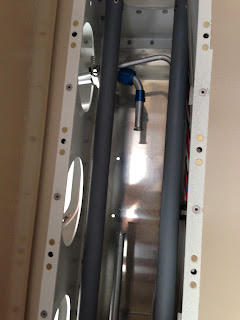
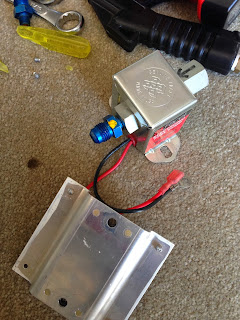

One additional problem I have seen once the shelf had come out is that I had primed the flange area between the shelf bottom where it touches the belly skin. The flange has to make electrical contact for the ground of the pump though and at this point it could only do that through the 4 rivets that were holding it to the skin. I do not think that was a very good connection and it might have limited the current for the pump as well. I removed the primer with MEK and will not reprime it but maybe put some conductive grease on it when putting it back in.
The new pump is at home in the shop and will be readied with fittings and electrical connector to be a drop-in replacement for the rusty one.

The fact that the pump came out so "easily" will make the further work so much nicer and was a great Christmas gift! Now I can put the replacement pump in and test it much quicker than I had anticipated. I might still have an additional flow problem but at least I did not have to remove the seat pan, bulkhead and the flaperon servo just to get the pump out.

Merry Christmas!

Monday, December 16, 2013

More On The Fuel Flow ...

I have finally overcome my paralysis and went back to the hangar to take the fuel system apart in my hunt for the bug that causes gas to just drizzle slowly out of the gascolator (when the bowl is removed).


By disconnecting the pushrods for the flaperons in the back where they are attached to the control horns, I was able to push them outboards just enough to allow a wrench to unscrew the nuts on the fuel pump fittings.


Once the lines were unhooked from the pump I was using a PVC hose to attach to the lines and blow some air through it (careful with the line between tank and pump! Remove the cap before doing this so to not inflate the tank). Both lines were free of any noticeable restrictions. The forward line was a little less open but I could hear the hissing, turbine-like sound of the flow transducer as the air was rushing through, so I am sure I got great flow.

I want to order some more fittings to confirm that it is indeed the pump that is causing the slow flow and not the tank before I go about removing the pump. Also, I want to be able to confirm that the replacement pump is indeed working better than what I have in the fuselage right now.

Thursday, December 5, 2013

It Wasn't In The Gascolator...

So I spent another night at the hangar trying to determine what is causing my fuel pressure issues. I opened the gascolator and found, practically nothing. The screen is clean and nothing indicated that it wasn't clean all along. What to do?
I decided to drain the rest of fuel out that I couldn't get with my handy ATV pump which amounted to about 5 gallons. I turned on the electric pump and put a bucket under the gascolator to catch the gas. This turned out to be an almost hour long ordeal as the flow was that minimal. The Skyview showed a flow of 6.4 gallons per hour and the amount drained and the time needed verified that it was pretty accurate.
I felt compelled to do the drain test for the last gallon which is part of the PAP and instead of 181 seconds (which would have been sufficient) it took me almost 20 minutes to squeeze that gallon out of the tank.
This clearly indicates a problem between the tank and the gascolator. When the flow started to be somewhat slow at the beginning of the drain, I removed the fuel cap to see if it was a venting issue but that did not have seemed to make a difference on the flow rate.
The next tests will be to remove the fuel line at the electric pump and to see which side has the restriction. My hopes are that the fuel pump is the culprit as this would be easier to fix than an issue in the tank or in the fuel lines (maybe the lines wouldn't be so problematic but I doubt accessibility would be easy).

To be continued...

Tuesday, December 3, 2013

Cowls Removed

With my recent experience of always underestimating the time to remove stuff from the airplane, I decided to drop by the hangar after work and get started on my fuel supply problem by removing the cowls.
That took indeed the better part of the little daylight that is left at the end of the workday now. I even got to remove the safety wiring from the gascolator screws, which turned out to be harder than putting the wire on those screws (!).
I also pumped out most of the leftover gas from the tank using a Facet ATV electric fuel pump system to reduce the amount I will have to wash through the open gascolator. Did I mention that I really hate sloshing around fuel in open containers?
I got the screws out and left the bowl in its place as it was getting really dark at that point and the lighting in my hangar is more on a level for emergency lighting than for working through the night.
Before I left I also inspected the carb spillover pans and found traces of a few drops of gas that had washed away some dust there. As I had a few high fuel pressure warnings through the first flight I wonder if this was the result of that or if dirt got into the carb bowls and breached the valve that should have prevented the bowl from overfilling. I will certainly have to run a test with the cowl removed when the fuel system is put together again.