So I decided to not wait for that failure and to replace it. I also wanted to address the obvious reliability issue with this regulator as well as improve the cooling issue with the air pick-up from the cylinder head plenum which does apparently not provide enough air at low RPMs on the ground.
After a lot of research and consideration I decided to go the most expensive route. I had initially settled on an aftermarket Harley regulator from Compu-Fire (55120) which I still believe to be a very good solution. However, the installation of said regulator would have required wiring work (to adapt to the existing Rotax plug) as well as mechanical work to provide an adapter plate for mounting and to rebuild the metal cap to control the cooling air flow.
I eventually found a better solution that would not require such work, or so I thought. The regulator is from a company in Germany (and before you ask, at this time they do not ship outside of the European Union, but I will be talking with them to solve this issue) called Silent-Hektik. They provide a wide variety of regulator/rectifiers for different application and also one for the Rotax 912/914 series (English translation) of engines. They also supply regulators for Jabiru 2200/3300 engines and even for common auto/motorbike conversions (at least common in Europe).
(Edit: Back when, I ordered the F4112 which seems to be replaced by the F4118 now)
This past weekend, I decided to put it in. Unfortunately, I forgot to bring my cell phone on the first day, so I could only take photos on the second day when everything had already been installed, trying to catch as much of the installation as possible.
Removing the Ducati regulator was fairly simple. I had just removed the upper cowling and that was sufficient, albeit without the lower it might have been somewhat easier.
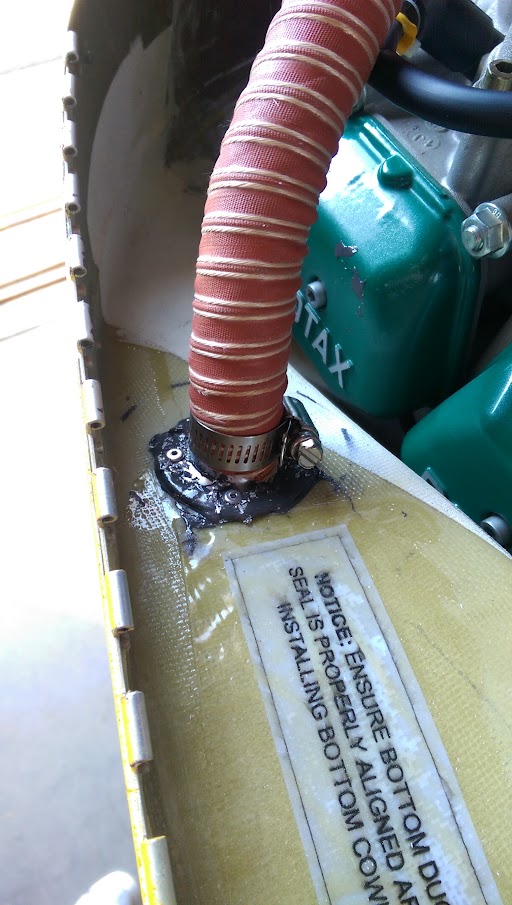
Getting the Silent-Hektik regulator in revealed two stumble blocks. While the case has the same outer dimensions as advertised, the top has one cooling fin more than the Ducati. This required either to rebuild the top cap or to bend it open and wing it. I opted for the latter. I also installed a flange on the cap, moving the hole over to the center. The flange allows for a 1" SCEET hose to attach with a worm clamp. The flange can be found here.
Take a close look at the corners of the cap in the following picture. I resealed the holes in the corners with silicone.

The other "issue" is that while the mounting holes on the Ducati are a lot bigger than you could ever need them to be, the Silent-Hektik has holes that are probably meant to be used with metric M5 or M6 bolts and an AN4 bolt will not fit. Of course, this is what Van's chose to mount the regulator to the firewall shelf. I drilled the holes open with a drill bit size that allowed for some slack of the bolt and it lines up perfectly with the existing nutplates on the shelf.
I wonder why Van's chose AN4 bolts as holding the regulator to the shelf is clearly not requiring a lot of force, but it already presented a problem with the Ducati as there was hardly any clearance to get a socket over the head of the bolt. It is even worse with the Silent-Hektik regulator as they really used every possible area to contribute to cooling the regulator and that means you will need a 7/16" crow foot to get this baby torqued down. With AN3 bolts the socket would have likely cleared just fine.

These were the only issues that I ran into that would make this installation not quite a perfect drop-in replacement. The plug fit like a glove though and snug right in and that is what I most cared about.
By the way, when I removed the Ducati regulator I could not see why it is frequently failing in this application. I had recently attached a temperature sticker on the side of it (around 50 hours) and it did not show a significantly high peak temperature.

It showed that it had reached 160F definitely and did not exceed 170F. Now, this is not a temperature you want silicon to operate at for a continuous time AND Ithe sticker was only on it during the cooler months in Arizona. So, yes, I can see that running it at 30-40F higher ambient temperatures could push it into the death zone.
The plug and the connector looked good though, no heat damage from high currents through bad connections or anything.

To avoid this overheating from happening again, I removed the existing plastic hose and plugged up the plenum pickup with a piece of scrap fiberglass glued on with silicone.

Not pretty but will definitely do its job. I also installed another temperature sticker on the Silent-Hektik.

For the new air pickup I drilled a hole in the top of the radiator tunnel and glued on another 1" flange using Pro-Seal.

The white insert in the flange is a piece of PVC tube that I glued in with silicone (so I could remove it later if I decide to install a scoop to increase pressure on the cooling pickup). From the tunnel it looks like this:

I hope this will help to divert air to the pickup line and increase flow during low RPM on the ground. I am currently at 87 hours and my next oil change is coming up. At that time I will check the temperature sticker and decide if need to install a scoop. If so, it will help to have the lower cowl removed and work on it from the radiator side.
As the Pro-Seal needed a day of curing before putting any stress on it, I had to return home at that point and let it sit.
The next morning I came back to the hangar only to find that the story about keeping Pro-Seal in the fridge to keep it from expiring are not true. My can had an expiration date of late 2013 on it and I kept it to do simple sealing jobs that would not require fuel resistance but where you wanted the paint-ability of the Pro-Seal. I kept it in the fridge ever since I used it for sealing the tank and the firewall in 2013.
Well, it does not cure anymore, at least not within 18 hours as the it used to. I know that it needs longer to fully cure but I would have expected it to be at least strong enough to hold the force of a bent SCEET tube. It did not and the flange was pulled off and tipped forward almost immediately after putting it on.
I had 3 options at that point. Remove the gunk and glue it on with 5-minute epoxy. I did not want to do that as the 5-minute epoxy gets brittle and could crack and break under vibration. I could wait and see if the pro-Seal eventually cures after a week. Not too excited about that idea either.
I could riveted the flange on and care about the Pro-Seal. That needed two people though as one would pull the riveter from the top of the tunnel while a helping hand would hold the washer on the shop end of the rivet that would relieve the stress on the thin fiberglass of the tunnel over a larger area and avoid cracking under vibration.
That very moment my friend and hangar neighbor Tim landed his Drifter and got ready to push her back. 5 minutes later the flange looked just fine with 4 rivets holding it down.
The last steps were to find a good path for routing the hose and to put the tie wraps back in place keeping everything tight together. The SCEET hose is 3' long and fit perfectly without any trimming.

It was still early enough to take her for a spin and I wanted to see if the regulator was doing its job. I pulled her out, jumped in and started the engine. While the Ducati needed at least 2500RPM at this point to drain the battery at only -1 Amps or just be at +/- 0, the Silent-Hektik presented me with a much better picture:

It charged with even more than 2 Amps before I could my phone out to take this picture. And all that at the lower range of the green arc. Perfect!
In flight I saw the voltage rising higher than with the Ducati. The Silent-Hektik charged the battery to 14.3V max. and kept it at 14.1V most of the time where the Ducati would be showing 13.7-13.8V. I heard that going for the higher voltage should enhance the battery life and maintain its performance by keeping the plates clean.
We shall see...
After my next oil change I will follow up and let you know how that air pickup is doing.


No comments:
Post a Comment