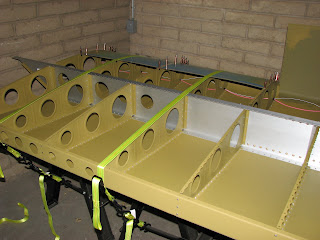
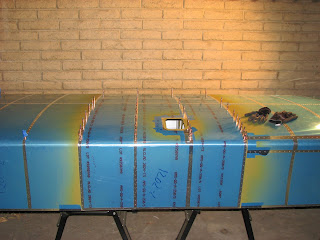
Sunday, October 31, 2010

Left Wing Inspected

So, today my EAA Technical Counselor came by to take a look at my work so far. Gil Alexander was happy with what he saw but noticed that I might have a problem with my paint gun with which I shoot the primer. He suggested going to a bigger nozzle and so I will be using the 1.8mm next time to see if this breaks up the paint drops a bit better. As I had never used primer before I didn't even know that the rough surface is not how it is supposed to look like. Fortunately this is more a cosmetic issue and it is on the inside of the plane.
Before Gil came by I had just finished shooting primer on the top skins and the last two main ribs for the right wing.


And I also moved the wing from the saw horses onto two folding tables to give it a bit more support during the assembly of the top skins. I put some mover's blankets from HF underneath the wing which provides just enough padding without making the rest wobbly.

Saturday, October 30, 2010

The Usual Prep Work

There is one inevitable thing coming out of having all that fun riveting skins on... and that is that once they are riveted on, the next step usually is less enjoyable and goes back to preparing parts. Deburring and Prepping that is.
So, that's what I did the last two days. Deburring the top skins and prepping them, getting them ready for another Acetone wipe and some primer.
Also, I called an EAA Technical Counselor who lives just a few miles away and asked him to take a look at my wing before I close it up. If everything works out, he should be coming by tomorrow. I'm curious if he finds anything that I missed...

Thursday, October 28, 2010

Left Bottom Skins are On


I finished clecoing and riveting the middle skin onto the skeleton today. The skin is pretty narrow and so it didn't take me long to finish this. I was very careful during riveting that I wouldn't press down too hard and when I had to I countered the push with my free hand pushing upwards from below to counter the load and avoid any warp to the wing.


I removed all leftover clecos from the rest of the wing to get it ready to get turned on its belly for when my wife comes home.


Turning the wing over with her help was pretty easy although I was a bit concerned about the overall weight of the wing by now. It really is not such a lightweight structure any more!


Doesn't it look beautiful? I think it does!
Now, I didn't want to let the forward part of the skins sit like this and I was worried about some deformation due to the weight. So I had to tackle this hurdle, too. It took a while but with these tiedown straps it was practically a cakewalk.


Just make sure you're going slow and add the tension evenly and pull down onto a rib to avoid bending the skin.


This is how I pulled down inboard and outboard skins and put the clecos in to hold them down. The middle skin I just clecoed down loosely as I want to get back at the stall warner to do the fine adjustment which I believe to be necessary. And I really want to avoid having to do this through that tiny access hatch on the bottom the wing.

The rest of the evening I spent preparing the top skins by removing the vinyl from the rivet lines. I can smell Cortec-440 coming up soon!
I also did a sum of the recently worked hours. Section 15 for the left wing added up to 37.5 hours, Section 16 which I consider to be done as the last step for the right wing won't take more than 5 minutes, came out at 6.5 hours and Section 17 had me working 20.5 hours so far. That all sums up to a total of 278.0 hours to this day.

Wednesday, October 27, 2010

Left Bottom Inboard and Outboard Skins Done

What a nice, successful evening!
I finished riveting the inboard skin and then clecoed the outboard skin that I had already put in place the night before.


The holes lined up very well but I clecoed every other hole as the outboard wing feels a little less stiff as the spar is thinner. I wanted to make sure that I am not warping anything while riveting, so I wanted the clecos to align the structure and hod it in place while I'm pushing a bit on the rivets.


Then I tried the tie down ring again and took a better picture this time.


Still fits perfectly. While I was screwing the ring in I saw something that explained why the manual was asking to only tap a significant amount less than the length of the threading on the ring. Remember how I was getting concerned about this when building the fuselage? I went back to it and threaded the AEX deeper to fully support the length of the ring's threading. With the wings I didn't even think about it and did the same. Now this photo shows that the AEX is separated from the skin by at least 1/4".


Well, after this little epiphany I seated the rivets and marked the do-not-yet-rivet holes and clecos. Here's the hedgehog ready to go:


The holes on the outboard skin are by far not as narrowly placed and so the riveting was done quickly.


So all that was left to do for the night was to put the center skin on - but wait! Wasn't there a problem with that one? Yes! I had this area of light spray of primer that I wanted to fix up on the weekend. Well, the weekend was far away and I really wanted to put the skin on - if it was just as a dust cover. So I was digging up a foam brush I had in my painter box and did the touch-up with that. After it dried, I threw the skin on and fiddled a bit getting the stall warner tab through the cut out and the ribs aligned with the holes.
I briefly clecoed it in place and cleaned up the shop with this great feeling of accomplishment! I better hurry prepping those top skins as they will soon go on the wing!

Tuesday, October 26, 2010

Left Bottom Inboard Skin Almost Done

I had a bit more than an hour tonight to rivet the left inboard skin on. I didn't expect this to be enough to finish the job but I was surprised how far I got. Actually I almost finished the job but then I had to make dinner and was called to the kitchen to work on my other duties. We had Aglio y Olio and after eating all that pasta it was time to unwind and get some rest before getting some sleep.
Well, here's the result of tonight's work:


It turned out that when riveting the LP4-3 rivets right before the CS4 holes that you can see a little deformation from the rib flange pushing against the skin. I double checked the manual and cannot find any trimming on these flanges that I might have missed. It's tricky to make a photo of that but I'll try to do it tomorrow night. I this happening in two places on the inboard skin and what I did to fix it is using another piece of straight and plane aluminum as a buffer and a light hammer to flatten that spot. It seems to work well which tells me that the flange is not pushing hard against the skin. So, if you want to avoid this, maybe you want to take a close look at these flanges and slightly bend the edges inwards to keep them away from the skin.


You can see in this photo that I also threw the outboard skin on. Not getting serious on that one yet but I noticed that we must have had a very blustery day as there was a lot of very fine dust (silicon oxide!) all over the inboard skin. So I thought it'd be better to cover the rib flanges from attracting more abrasive material that could get caught between flange and skin when putting the skin on. I don't have a canvas cloth large enough to cover the whole wing but I think I should get one soon. On a second thought, maybe I should get a tarp as the dust is so fine it could probably get through the canvas too easily.

I also tried the 3/8" hole I final drilled for clearing the tie down hook. The photo is blurry (don't really understand why) but I hope you can see how perfect the fit is. I'll try a better photo tomorrow evening and replace this one if it turns out to be better (which is very likely).


BTW: After watching an EAA webinar on the Zodiac CH650 I got a little worried about me assembling the wing on saw horses instead of on a stable and flat table. After all there is a chance that I could introduce some warp to the wing while riveting. I wrote Van's Tech Support a message asking about this and the response was that they are asking for a table in section 17-01 only because it is more stable when pushing and pulling on the wing structure during assembly. The table is not used as a jig (like with the CH650) and if you can make the saw horses stable enough and give them some padding to prevent the thin flanges from getting bent then you're fine.
I used some towels under the wing for padding but mainly to prevent scratches in the primer. I will double check tomorrow night if the padding is soft enough to save the flanges.

Monday, October 25, 2010

Left Inboard Bottom Skin in Place

Tonight I installed the terminal bracket on the left wing and attached the wires to it. Be careful not to overtighten the screws. The plastic base material os pretty soft under pressure and it is easy to tighten the screws too much which will place them lower compared to the bracket surface. I had done this and had to remove the first screw and add a washer underneath to compensate for this problem. So take it easy here. This finished section 16 for the left wing.
I also threw the inboard bottom skin on as I had planned. This was followed by a cleco session and seating the rivets.


I decided to reduce the possible warp I could introduce to the wing to a minimum by first riveting the line along the spar starting from the center and working my way to the outsides, followed by riveting the perpendicular center line going from the spar to the nose and then from the spar to the aft side of the wing. This should reduce any problems from minimal differences in fit.
And that's just how far I got tonight before I had to close the shop and get some rest. Anyway I got 3 hours worth of quality time in. Not bad for a weekday!


There are so many rivets on that part that I am not sure if I will be able to finish this tomorrow evening. We'll see...

Sunday, October 24, 2010

Left Bottom Skins Primed

Four hours of priming work turned that huge stack of silvery aluminum into matte green. That included wiping off the bare skins with acetone to get rid of any left over contaminants.


I didn't just prime the skins but also the stack of main ribs for the right wing and some small parts.


After final inspection it turns out that I must have missed a spot on the W-1202L skin which is the one that overlaps the inboard and outboard skins and therefore goes on last. I should have enough work for this week's evenings that this will not slow me down. So I assume that I will fix this little problem next weekend when I shoot more primer, probably on the nose ribs for the right wing.
To be able to work on the left wing during the evenings without any help I had to turn the wing over and get the bottom up. My wife helped me turn this thing over.

Saturday, October 23, 2010

Prepping Skins

I did a lot of different work today. There first was extensive deburring of the edges and all the holes on the outside of all 3 skins for the left wing. The holes are punched from the inside, so only the outside needed that time consuming deburring done.
Then I removed the vinyl around the rivet lines which took so long that I was wondering if the additional protection was really worth the effort.
Followed by some taping and marking of the areas on the outside of the skins where I will prep and prime because skins are overlapping or where the doubler is being added on the inboard skin.
All this preparation work seemed to have taken up the better half of the day when I finally got to do the actual metal prepping. It was getting close to sunset and it turned out that I was only able to do two of the three skins.


The middle one which is being riveted last has yet to be prepped which I hope to do tomorrow morning right before shooting the primer on all prepped surfaces.


Oh, and I also put the wire for the nav light in, but I think that actually happened yesterday or the day before yesterday, I just forgot to mention it before.

Friday, October 22, 2010

Copperstate 2010

I spent a few hours in Casa Grande this morning to see if I could find an RV-12 and maybe could get a ride. Van's didn't want to bring theirs and left the field to RANS. Their tent was swamped and people were swarming both factory S-19s. Can you hear that I am disappointed about Van's decision?
I saw one RV-12 from nearby Scottsdale. Unfortunately, the pilot was nowhere to be seen ...

Thursday, October 21, 2010

Stall Warner Installed

It was quite an exiting day today. Besides installing the stall warner I also found a mistake I had made when riveting the nose ribs to the left spar. But let's start in chronological order.
I've assembled the stall warning subassembly and followed the instruction and the figures precisely. It was reported before that the washers used to position the vane in the center of the cutout of the center skin might not be thick enough. My stack of 5 washers measured .155" and as I had exactly the amount of washers that Van's mentioned in the manual I couldn't change this, so I went ahead and put the skin on to do the fine adjustment. Or so I wanted.
When I screwed the subassembly onto the rib I noticed that I could not turn the unit to adjust the vane position. The upper cutout in the base plate was a bit too narrow to allow the plate to move around the screw. So I took the subassembly off again, clamped it in the vise and filed the opening a bit wider. Back on the rib it proved to be usable now, so on with the skin and voila!
The vane was perfectly centered and almost perfectly adjusted as well. The fine adjustment is really tricky as most humans don't have arms long enough to get around both sides of the skin to manipulate the screw and the subassembly at the same time. While having x-ray vision to see through the upper part of the skin that blocks a view with ordinary eyes to see what you're doing. Somehow I managed to do all that without super-powers and I hope that tightening the screws after removing the skin did not change the adjustment or I will have to go through this again before riveting it on.
Wires installed and although I was afraid of having now connection to common ground because of all the primer I must have been lucky as the switch connected perfectly when agitated.


It was when I clecoed the skin on that I got to the most outboard rib where the center skins attaches to that I realized that this one didn't have a flange for the hole I was supposed to cleco. I went around it during the adjustment but then when the skin was removed I realized that I must have messed up the stack of ribs (again) when I prepared for the riveting. Somehow I got the one rib in there that is supposed to go onto the right side in the stiffener block at the root of the wing as this one has to have the nose flanges removed. The one I had put aside for this job was in the workshop and had the flanges!


The solution was simple but with the ribs installed maybe hard to do. I measured the room in between the ribs and yes, with the rivet removing tool in the chuck my shortest drill was too long to position on the rivets cleanly. Fortunately I had bought an angle drill a while back at HF and put it in storage (you can never have too many tools). This was now a real life saver!
I located the angle drill, put the remover tool on and voila! It fit easily between the ribs to get the job done.


This tool made it very easy as the tip positions the drill perfectly centered using the manufactured head to align the drill bit. You push the spinning drill bit down and the head goes flying. It helps to first push the mandrel all the way down by using a center punch a few times on each rivet. Once the head's gone, the shaft of the rivet can be pushed out with the center punch.


The rest was a cake walk! The correct rib clecoed in place and riveted on in minutes. The rivet removing tool is so gentle that you can hardly tell that the removed rib was actually used before.


Now, something like this better not happen on the 4 inboard ribs as they are so close that even an angle drill won't help you. You'd have to remove more than just one in that case. Also I'm not sure if the rivet remover would be so nice to use on the spar flanges for the ribs that are riveted to the angle tab AND the spar. The flange on the spar side is very narrow and I doubt this would have had such a nice happy ending like the one I had to repair.
So, the warning is: Double or triple check that you have the right rib in the right place before riveting!

Wednesday, October 20, 2010

Scrubbing Along...

The last two days I was coming home from the day job and preparing the next stack of ribs for priming by scrubbing them with Cortec 440. There's really not a lot to report about that and I'm sure you're already grown tired of photos of different stacks of aluminum piling up. So here's one from the actual activity.


It's a real boring job and so I try to do 6 ribs a night, hoping that this way my mind is not overly numbed by this activity but yet enough to build a nice stack for the priming during day time on the weekend.
I just realized that preparing the ribs for the right wng is not the right thing to do as I want to finish the left one first, so after I finished my ribs for the night, I did some prep work on the skins for the left wing. Mainly sorting and organizing so I have easy access to the skins when I need them.

Saturday, October 16, 2010

Left Wing Skeleton Done

That was a long day today. I started at 11 am with cleaning the prepped ribs by wiping them with Acetone. There's always some residue on them that I want to get off. The primer sticks much better on clean aluminum.
Then I went on shooting the primer on 14 ribs. That went pretty quickly with the big gun but I needed some time detailing to really be happy with the result. Because of the large amount of ribs I had to utilize my trucks' hood as a drying rack.


That way I could shoot the next stack while the previous one was drying on one side. I think that was the main reason why the process went fairly fast.

After some time cleaning up and getting the paint out of the gun in which the primer had some time to settle, I went on to prepare the fun of the day: riveting those ribs to the spar!


I followed the plans, started outboard and worked my way inboards - rib by rib. This way I had enough room to rivet the ribs with the manufactured head on the ribs as they asked to do.


Here the outboard 5 are done.

When getting further inboard the ribs have to be riveted to the flange angle as well as to the spar. These ribs then have a rear flange. When I riveted those I first riveted the upper and lower hole through the ribs web into the spar angle. Then I riveted one of the rear flange holes and then the web hole right in front of that. That way I had always enough room to get the P26A riveter lined up and didn't have to use a wedge tool.


Getting the inboard 4 ribs riveted was a pain. The spacing is so narrow that I could hardly get the riveter in there to do the job. This got real bad when the one -L rib (second from inboard) was riveted. This one goes in opposite to the other ribs which mean that then I had to rivet from the right. But on that side was already a rib installed, so I had to bend that one out of the way to be able to open the handles of the P26A. It's awkward but it worked without damaging anything.

After 3.5 hours of riveting I had this:


Just because I mentioned the time... so far I have been working more than 37 hours on the wing kit.

Friday, October 15, 2010

Finished Rib Prep Work for Left Wing

Just a short note... I finished the prep work on the ribs for the left wing tonight. Now I have a matte silver stack of ribs sitting in the workshop waiting to get wiped off with Acetone and get primed. There are 13 nose ribs plus the one hinge holding rib of the right wing and its bracket doubler.
Sounds like another busy weekend...

Thursday, October 14, 2010

A Little Prep Work

The weekend is coming and I am getting ready for another primer-shooting session. As the days got rather short now in Southern Arizona, working during the week became less enjoyable as I have to use shop lights to light the working area if I can't do the job inside the workshop. This is certainly the case with the prep work as I don't want to deal with water and strong bases inside.
I found a workable arrangement putting the light far enough away so the bugs wouldn't bother me while still providing enough light on the part I'm working on.
Here's the stack of nose ribs for the left wing, plus one drilled rib for the right wing with its hinge bracket doubler. I do this in matching pairs so I don't mix them up when I remove the markings during the prepping and priming. After the primer dried they will get marked again so I know which bracket was used to drill which main rib. That way they should go together perfectly.


After two hours of scrubbing and rinsing I got 6 nose ribs done. Here are four hanging on the drying rack.


Van's has already sent the replacement main ribs that I had ordered late last week. I quickly deburred those two main ribs and re-completed the stack of main ribs that shouldn't get any modification. So the ribs for the right wing are also ready to go through the priming process. Pretty good timing as this will come next after I put the nose ribs on the left wing.
That is if I don't deviate from the plans that would like me to build both wing skeletons first before starting the skinning process. I think I don't have the room to store the relatively fragile skeleton of an unskinned wing while working on the other. At least not safely. So I think about completing one wing before starting to work on the other one.
I'll decide that when I can see how wobbly the skeleton is. If it is sturdy enough to sit in the wing cradle I can stick to the plans.

Monday, October 11, 2010

Fuselage Kit Arrived

The Fedex guy dropped by again and had my fuse kit this afternoon. Just one crate, but boy is this one heavy! 230 lbs and the create sure had it's problems. I saw a broken up side around a knot in the wood that started building a crack. I opened the box while the guy was still there to make sure everything was ok and it was!

After removing all the paper it appears like the crate could have been smaller with all the areas that seem to be missing parts.


I finished the inventory late tonight after 6 hours of going through the parts. Boy, this is a very large kit! I don't think it took me that long before to do the inventory. The amount of aluminum parts is amazing and there's a seemingly never-ending amount of paper bags.
This sure will take some time to put together. Anyway, for now I just put everything back in the box and store under the tailcone until I'm done with the wings.
2 screws were missing from one bag and that was it. This time a lot of the bags contained extra parts, so dropping one nut or a screw shouldn't cause any problems. Good job, Van's!

Sunday, October 10, 2010

Main RIbs Riveted to Left Spar

With the efforts the of the last two days everything was ready to start on the left spar. Before I wanted to do that I wanted to catch up with a few left out tasks from the previous pages and get these out of the way. They consisted of riveting nutplates to 3 nose ribs and riveting the doublers to the front of two main ribs. That didn't take long - including one drill out procedure because of slipping off a rivet in the wrong moment. No harm done.


So here I was, rearranging the work area in expectation of the Fuse kit delivery tomorrow afternoon. Main goal: Getting the spar as close to the workshop as possible to ensure short ways when getting needed tools.


Here we go, ready to attach some ribs! Despite the manual telling me to cleco and rivet rib by rib (or at least that's what I translated from Oregonian), I decided to cleco all the ribs first before starting riveting.


Notice that the inboard rib is mounted with its rib double on the outboard side of the flange although this doesn't look right as the doubler will get bent in the riveting process. Van's and some blogs confirmed this is the way to go.


All ribs clecoed, ready to insert the rivets and start my favorite part! After about an hour of fun - well, partly as you either have to fiddle with the wedge tool or use the manual tight spaces riveter in between the inner ribs and on the rivets next to the spar bracket flange - it looked like this:


This went so well and there was still some energy left in me that I decided to go and add the rear spar as well. Besides, the whole structure is quite wobbly before you attach the rear spar and I didn't want to get anything damaged when I run into it at night.
The rear spar attachment requires some match drilling on the inboard rib. So on it goes for drilling...


... and off it comes for deburring and cleaning away the chips. Then it goes on again and the riveting starts. I don't want to bore you with the details, so here's the end result.


Make sure that you use LP4-4 on all four holes on the inboard rib, the one you match drilled before.


And that was the end for today! Nice looking wing that is... So, now the nose ribs have to get some prep 'n' prime treatment and then the left wing skeleton would be done.