Yes, I am still here. Didn't do much building on the RV-12 recently though. Part of this is owed to selling my little grasshopper which is supposed to allow to purchase an Engine Kit if I decide to stay on the ELSA track.
This sale got finalized on Friday when I received the funds and the plane was flown to Southern California where the new owner took it over to spend some vacation and then fly it up to its new home in Washington state.
Now, that this is done and I don't have the worries of how to finance my RV-12 anymore, I should be back at building the next days = despite the still active monsoons.
Saturday, July 23, 2011
Wednesday, July 13, 2011
Catching Up With Controls
After closing up the fuel tank and still waiting for the sealant to fully cure, I caught up with the installation of the control elements.
The first step was to trim the blocks that would hold down the flap handle.

Before installing the flap handle I realized that going further back in the tunnel to install the flaperon pushrods the still installed turtle deck skins would make access unnecessarily hard, so I removed them.

Back to installing the flap handle. It turned out that it was easier to install the flap handle and the flaperon mixer at the same time as they are connected.

I noticed that the sticks were not quite aligned and straight after connecting everything to the mixer. The right stick appeared to be ok but the pilot side was pointing outboards when supposed to be in straight and level flight. I even sat in there to verify that this wasn't an optical illusion. I had measured the pushrods and set them according to the plans. I decided to adjust this a little as I didn't like the look of it. This took quite some time but I ended with 3 full turns longer than I had the pushrod measured before. The whole adjustment process was a bit awkward and mostly guess work, because the sticks move when the flap handle is actuated. It must be coming from the radial movement of the mixer which is supposed to the a linear one. I wonder how this will feel in flight. Here's a better shot of the flaperon mixer.

Installing all this took around an hour as accessibility was close to ridiculous with the fuselage on its belly. I decided to turn the fuse on its side for the next steps. With the tail cone attached, it is significantly harder to turn the fuselage on its side but it's still manageable.
When I wanted to slide the flaperon pushrods into the tunnel I realized I had made a building mistake. The roll servo was already installed and torqued into place which prevented me from getting those dang long pushrods into the tunnel. The only possible access point is through that cutout in the back of the cockpit floor that was blocked by the servo. I removed it, cussed because of those two forward bolts that are hardly accessible and slid the pushrods in without any problem.

I put the servo back in place and cussed a bit more (about the same bolts as before). Here's a picture of the rear tunnel with the pushrods installed.

Finally I installed the powder-coated Flaperon Torque Arms and connected them temporarily to the pushrods. They will get match drilled a little later and then removed again to get match drilled on the opposite side which you can't reach with the arms installed in the plane.
Once this was all connected I was amazed how mushy and wobbly the whole control track felt. I think it mostly caused by the torque arms not having a stable pivoting point. They can literally move all 3 dimensions and so they try to avoid to go in the direction you want to go in. I expect this to go away when their counterparts are installed and the wings are connected as they will provide lateral stability for the bearing of the torque arms.

Here's a view of the whole installation area.

I just hope I don't have to take anything of this out again - ever. I am completely aware that by saying this I have doomed myself to eventually having to just do that - taking it all out again. It will probably be because of a fuel leak which I overlooked despite all the pressure testing ... Can you tell I'm in a positive mood today?
Monday, July 11, 2011
Fuel Tank Closed Up
Today was the day. Let's just hope I don't have to do this again!

Two things I did, deviating from the plans, I should mention. First, the order of the final assembly.
I had the front plate uninstalled when getting to this final step. First I riveted the clips to the top, gooping them up as necessary.
Then I put a thick layer of sealant in the corners to seal off the top when it comes on. Use a finger to spread it well but leave it thick, don't spread it out too much. Don't forget to put lots of goop on the inside where the tank has this little bent. The cutouts in that bend have to be well covered with sealant.
Then I installed the top skin. Don't worry about the clips just yet. Focus on aligning the skin without losing too much of the goop. Once sparsely clecoed, reach inside the tank through the front plate and snap the clips onto the return line. Mine felt a little loose so I added a cherry sized amount of sealant to them. Just goop it on a finger and feel your way with one of the clean ones.
After riveting the top skin on, I riveted the filler neck on, then finally going for the front plate and then installing the fuel sender.
This all took exactly two hours after mixing which happens to be the pot life of my Chemseal stuff.
The second thing I changed is quite obvious in the picture. It's the added ground wire, directly attached to one of the screws that holds the sender in place. I felt that with multiple layers of ProSeal the ground would have a hard time getting propagated over those plates. Installing a wire is much simpler and more reliable. I will run the other end to the forward inboard mounting screw.
Sunday, July 10, 2011
Selling a Plane for an Engine
This week was quite an exhausting one. Not because of countless hours in the shop but because of readying my little grasshopper for sale. It is currently undergoing a pre-sale inspection and will be hangared thereafter to protect from this year's violent summer storms. If the inspection doesn't reveal any yet undiscovered problems with the engine the sale should got through this month.
Although I haven't built this little gem and just owned a few months short of two years, I have built up quite some pleasant memories during this time and while flying it into the controlled airspace of the strip where the inspection would take place, I relived all these great memories. It was a challenging task to perform a greaser landing while being distracted of the realization that this might very well be the last time landing this beautiful plane.
Once we have done the paperwork next week, I should have my answer as to how to pay for the RV-12 engine kit and also a revitalized and strong desire to finish the build at hand.


Wednesday, July 6, 2011
Monsoons Stopped Building
The last two days I came home to find that the electricity had been cut off and they didn't repair it until late in the night. So, no light in the shop, no A/C, no internet. I didn't get to start the last chapter on the fuel tank therefore and it might not be the last chapter anyway if I find a leak.
Let's hope those monsoons decide to dump their load in another part of town for the next days so I get to finish this task.
Let's hope those monsoons decide to dump their load in another part of town for the next days so I get to finish this task.
Sunday, July 3, 2011
Fuel Tank Ready for Final Step
The last few days I was on and off working on the plane, mostly in the shop. It wasn't really worth posting every little step of progress so I am summarizing the last days in one post today.
On Thursday, I manufactured the clips that will hold the fuel return line to the top skin of the tank. It would have been an easy job had Van's provided the material. I thought I had seen a strip of aluminum for this purpose but as much as I was browsing and searching the list of contents for the bags, I could not find it. A part that small must be either in the bags or was a leftover from a larger part where most of it was used elsewhere, alas I could not remember where I would have put such a left over. Either way, I had no material and studying the drawing I thought I scrounge up some skin pieces from the scrap bin. I did so and cut and bent the piece to shape and created some beautiful clamps - only to find that I had overlooked the material thickness laid out in the drawing. It said .032 and I had used ordinary .025 from a skin. So back to the scrap bin and retrieving some .032 parts this time. This is a rare good but after a while I found a suitable piece and went through the manufacturing process once again.

Then I manufactured the return line inside the tank. I cut the tube to length, allowing for a lot of excess material (final cut can happen once installed). Flaring one end was simple and I installed it on the fitting. Making those bends inside the tank was not really hard to do and it helped determining the correct position for the bend by eye-balling the height from the side of the tank.
After the first bend I put on the top skin with a few clecos to determine where I had to make the upward bend to guide the line into the filler tube.

I marked the position this time (pretty close to the cutout as the bend takes a half the diameter of the opening), removed the skin and bent the tube. Then I put the skin back on and also put the flange in position to determine how much of the tube I had to cut off.

I cut off the tube and deburred the end, then removed the top skin.

That was the result of Thursday. I had also tried to rivet in the ring for the Moeller gauge but this attempt failed miserably. It turned out that I had no good flat surface that was also strong enough to not dent when hammered and allow the skin to rest evenly at the same time. I ordered a steel plate at Amazon to try again.
The steel plate arrived on Saturday and that's when I went back at it. With a little effort I was able to get those countersunk rivets set without pushing them out in the process. I held the nutplates in place with their respective screw after alliging the rivet holes with clecos.

As the final installation will be done with Pro-Seal it doesn't matter if the rivets are really completely flat with the surface.
This is how the inside of the tank will look like.

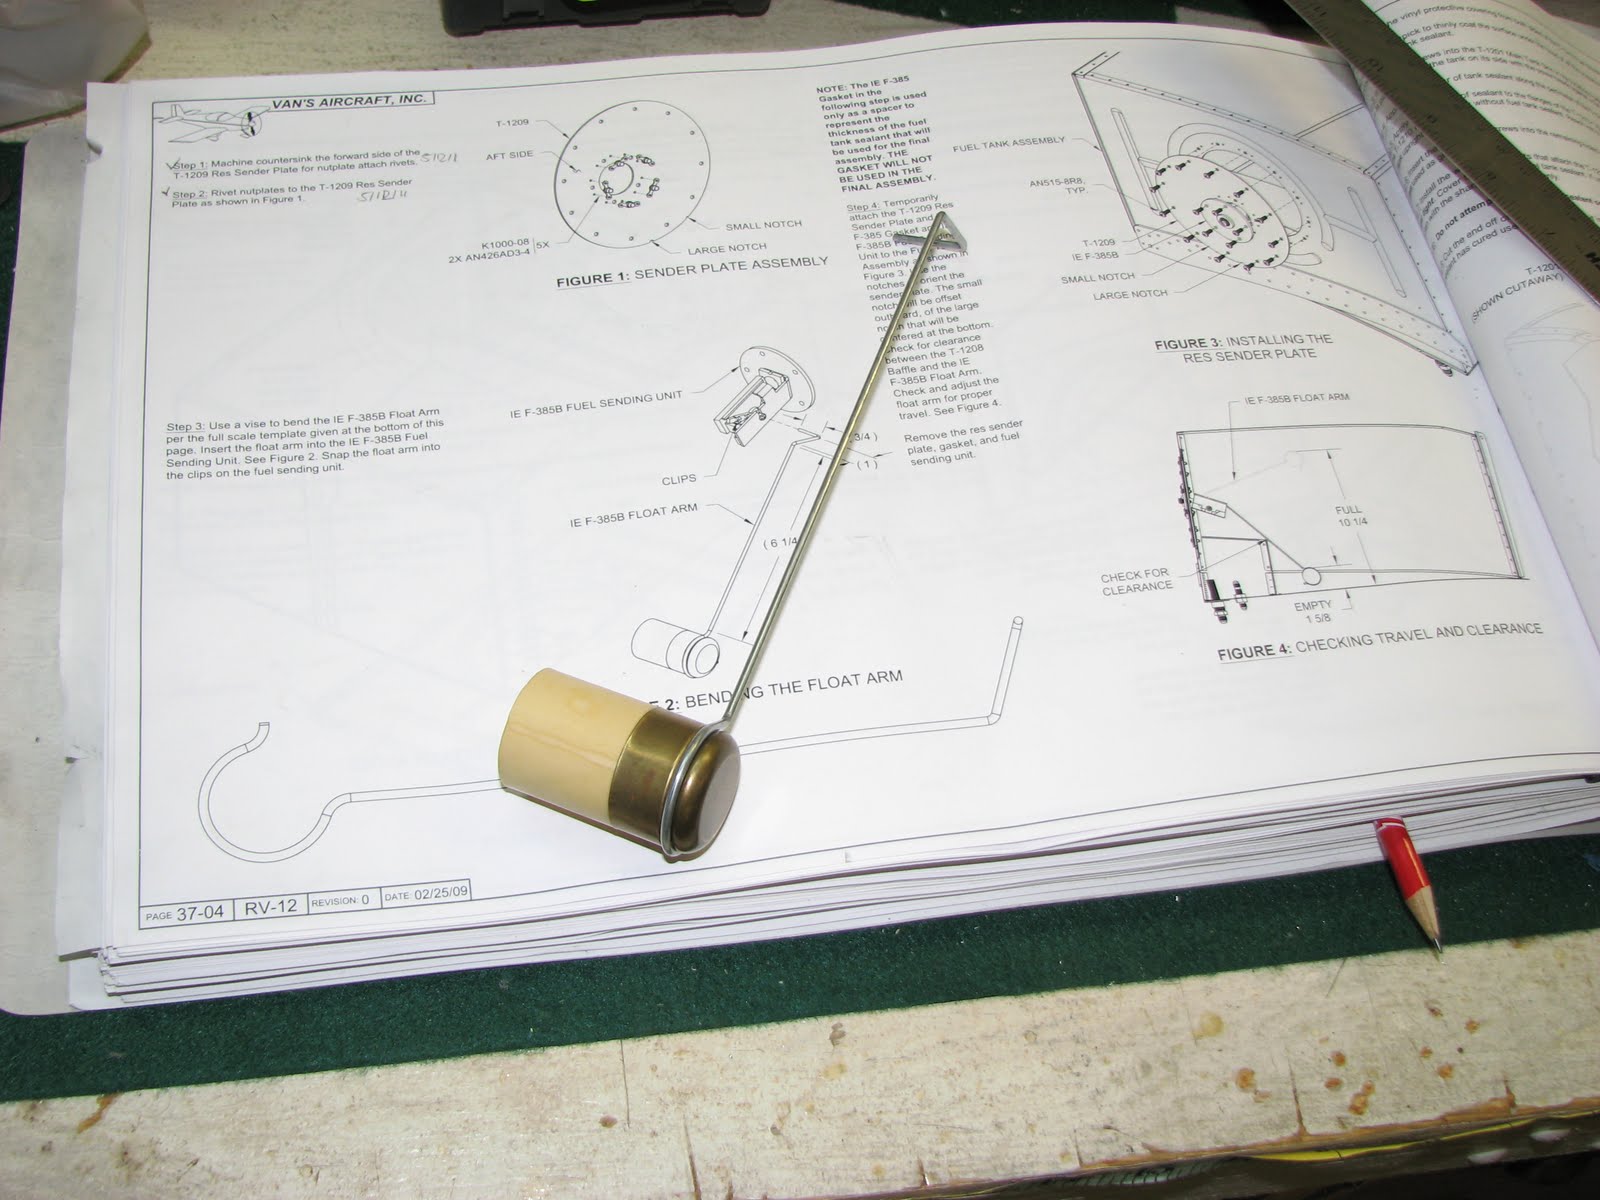
On Sunday, today, I finished the tank work by pre-installing the fuel sender and scuffing up the flanges that will get prosealed and riveted next. Bending the steel wire to plans was easy with a vice and a hammer - but, hey, I have a lot of experience since the flaperons when it comes to banging the cr*p out metal!


That done, I had to verify that the sender arm wouldn't contact the cross baffle, so I installed the sender for a trial fit.


As you can see the baffle was not an issue. I could easily put my finger in between the baffle and the wire without lifting the floater. I also measured the arm movement and I came quite close to the values listed in the instructions. In lowest positions the top of the floater is 1 5/8" above the tank bottom. At the highest position this measures 10 3/4", 1/2" more than in the instructions.
Then I went on and made two candles as Dave called them. If you're unfamiliar with Dave's recent blog entry, he was talking about the flaperon push tubes.
After cutting, deburring and truing the cut of the tubes, I marked the center of the holes to drill with blue tape. I have some aluminum brackets to hold pipes in a vise which came in very handy now.

I drilled the hole through the tube so it exited in the other side to reduce the number of alignments (and curses) I had to do. To make sure that the second set of holes would be close to be "evenly spaced" with the first set, I used this little trick (look at the head of the bolt):

The result looked like this.

I prepped and primed the parts and riveted them together (make sure mark them before taking them apart so you know which stub goes into which end of which tube!) and adjusted them for correct length.

The tank is now ready to get its finally internal cleaning and then I can goop the parts together and pray that the pressure test after it fully cured will show that it is indeed not leaking. I might be doing this tomorrow morning ...
On Thursday, I manufactured the clips that will hold the fuel return line to the top skin of the tank. It would have been an easy job had Van's provided the material. I thought I had seen a strip of aluminum for this purpose but as much as I was browsing and searching the list of contents for the bags, I could not find it. A part that small must be either in the bags or was a leftover from a larger part where most of it was used elsewhere, alas I could not remember where I would have put such a left over. Either way, I had no material and studying the drawing I thought I scrounge up some skin pieces from the scrap bin. I did so and cut and bent the piece to shape and created some beautiful clamps - only to find that I had overlooked the material thickness laid out in the drawing. It said .032 and I had used ordinary .025 from a skin. So back to the scrap bin and retrieving some .032 parts this time. This is a rare good but after a while I found a suitable piece and went through the manufacturing process once again.

Then I manufactured the return line inside the tank. I cut the tube to length, allowing for a lot of excess material (final cut can happen once installed). Flaring one end was simple and I installed it on the fitting. Making those bends inside the tank was not really hard to do and it helped determining the correct position for the bend by eye-balling the height from the side of the tank.
After the first bend I put on the top skin with a few clecos to determine where I had to make the upward bend to guide the line into the filler tube.

I marked the position this time (pretty close to the cutout as the bend takes a half the diameter of the opening), removed the skin and bent the tube. Then I put the skin back on and also put the flange in position to determine how much of the tube I had to cut off.

I cut off the tube and deburred the end, then removed the top skin.

That was the result of Thursday. I had also tried to rivet in the ring for the Moeller gauge but this attempt failed miserably. It turned out that I had no good flat surface that was also strong enough to not dent when hammered and allow the skin to rest evenly at the same time. I ordered a steel plate at Amazon to try again.
The steel plate arrived on Saturday and that's when I went back at it. With a little effort I was able to get those countersunk rivets set without pushing them out in the process. I held the nutplates in place with their respective screw after alliging the rivet holes with clecos.

As the final installation will be done with Pro-Seal it doesn't matter if the rivets are really completely flat with the surface.
This is how the inside of the tank will look like.

On Sunday, today, I finished the tank work by pre-installing the fuel sender and scuffing up the flanges that will get prosealed and riveted next. Bending the steel wire to plans was easy with a vice and a hammer - but, hey, I have a lot of experience since the flaperons when it comes to banging the cr*p out metal!


That done, I had to verify that the sender arm wouldn't contact the cross baffle, so I installed the sender for a trial fit.


As you can see the baffle was not an issue. I could easily put my finger in between the baffle and the wire without lifting the floater. I also measured the arm movement and I came quite close to the values listed in the instructions. In lowest positions the top of the floater is 1 5/8" above the tank bottom. At the highest position this measures 10 3/4", 1/2" more than in the instructions.
Then I went on and made two candles as Dave called them. If you're unfamiliar with Dave's recent blog entry, he was talking about the flaperon push tubes.
After cutting, deburring and truing the cut of the tubes, I marked the center of the holes to drill with blue tape. I have some aluminum brackets to hold pipes in a vise which came in very handy now.

I drilled the hole through the tube so it exited in the other side to reduce the number of alignments (and curses) I had to do. To make sure that the second set of holes would be close to be "evenly spaced" with the first set, I used this little trick (look at the head of the bolt):

The result looked like this.

I prepped and primed the parts and riveted them together (make sure mark them before taking them apart so you know which stub goes into which end of which tube!) and adjusted them for correct length.

The tank is now ready to get its finally internal cleaning and then I can goop the parts together and pray that the pressure test after it fully cured will show that it is indeed not leaking. I might be doing this tomorrow morning ...
Subscribe to:
Posts (Atom)

