Showing posts with label Avionics Kit. Show all posts

Wednesday, August 21, 2013

Landing Gear Section Completed

I was mainly closing out sections tonight. One of them was the landing gear section. The little covers I had primed yesterday were ready to get riveted.


So on they went.


And just as quickly they were riveted on.


I also finalized the wiring on the Avionics by tightening and cutting the wire ties.


Adjusting the audio levels is probably only doable in the hangar when everything is hooked up, including the mechanical stall warner.

I also crept forward in the Miscellaneous section by starting to install the retention devices.


And then the mosquitos got a bit annoying as it was dark and me the only lighted food source around.

Saturday, August 17, 2013

Skyview Updated to 6.2

Darryn correctly commented that my map data had expired. So to please him and to get my full map view back, I updated to V6.2 along with the latest aviation maps from the FAA.


It took a few minutes before everything had been updated (make sure to turn on Avionics and Autopilot switches as all the Dynon devices will be updated) but at least the new update process works with one single file and you can clean the hangar while it is updating.


Looks like some refreshing thunderstorms are building up around me. This is certainly very welcome!

Friday, August 9, 2013

Involuntary (Pneumatic) Leak Test

On Thursday evening I had some visitors that wanted to see the plane. A 17-year old boy named Patrick who wants to study Aeronautical Engineering was the driving reason for this interest.
Among other things I also wanted to give him an idea of modern experimental avionic systems and so I fired up the Skyview. He was impressed and even more so as the SV showed a constant airspeed of 59 knots. Whatever I did did nothing to change the airspeed and I was getting seriously worried that I would have to replace the ADAHRS unit again.
We even (lightly) blew into the pitot tube to see if was open and yes, it did increase the airspeed but only to settle back at 59 knots when we stopped.

What was this?

Well, that night I was too occupied to show Patrick everything he wanted to see and I delayed the troubleshooting till the next day.

The solution occurred to me while I was at work. I remember that I had previously plumbed up the ADAHRS and I had even posted this a few weeks back on the blog. That by itself was not the problem though. What I had forgotten during the plumbing was the fact that I had still tape over the static ports as I am still worried about mud daubers clogging up this vital ports.
Now with the tape in place and the static system hooked up, I had created a closed system that changes pressure with the ambient temperature.
When we looked at the Skyview, it was night and bit less hot than on the day I sealed the system. This naturally causes a slight vacuum while the pitot was still measuring ambient pressure. Now the pitot pressure was greater than the static pressure measured by the SV and that must show as airspeed.

Perfectly normal!

I was anxious to get home and confirm my theory by removing the tape from one of the static ports and sure enough, the speed went down immediately from what was then 29 knots. It was much warmer than on the night when we saw the 59 but less hot than on the day I sealed the system.

This also means that this static system had gone through quite some pressure cycles and did obviously not leak enough to come to equilibrium with ambient pressure.

I think this is a great low leak rate and therefore I have involuntarily tested the static system. I will stil perform a formal test though but I am very confident that this will just verify what I have already determined.

Saturday, July 20, 2013

ADSB-in Works!

In the morning I got the Avionics system ready for another test and I hooked up an antenna to the ADSB-in box temporarily. Finally, a good experience with Dynon. Nothing to complain, everything worked just by flipping a switch.


The ADSB-in is hooked up to serial port #2 and once I selected that it attached to a ADSB-470 it immediately worked. The ADSB-470 entry is pretty far down the list which appeared to be sorted by Dynon products first but then the ADSB box showed up way down along with other non-Dynon stuff.


You will see an additional active ADSB status page that shows you when you received what kind of information and how much of these packages you received since power on.
Great stuff, I could see a thunderstorm developing around me on the map display before I heard the first thunder. Unfortunately, I did not take a photo of that.

I disconnected the antenna and prepared for the installation of it. For routing the wiring I got some nice self-sticking foam clips. I think they worked great. The adhesive is made by 3M so it should stay on for good.


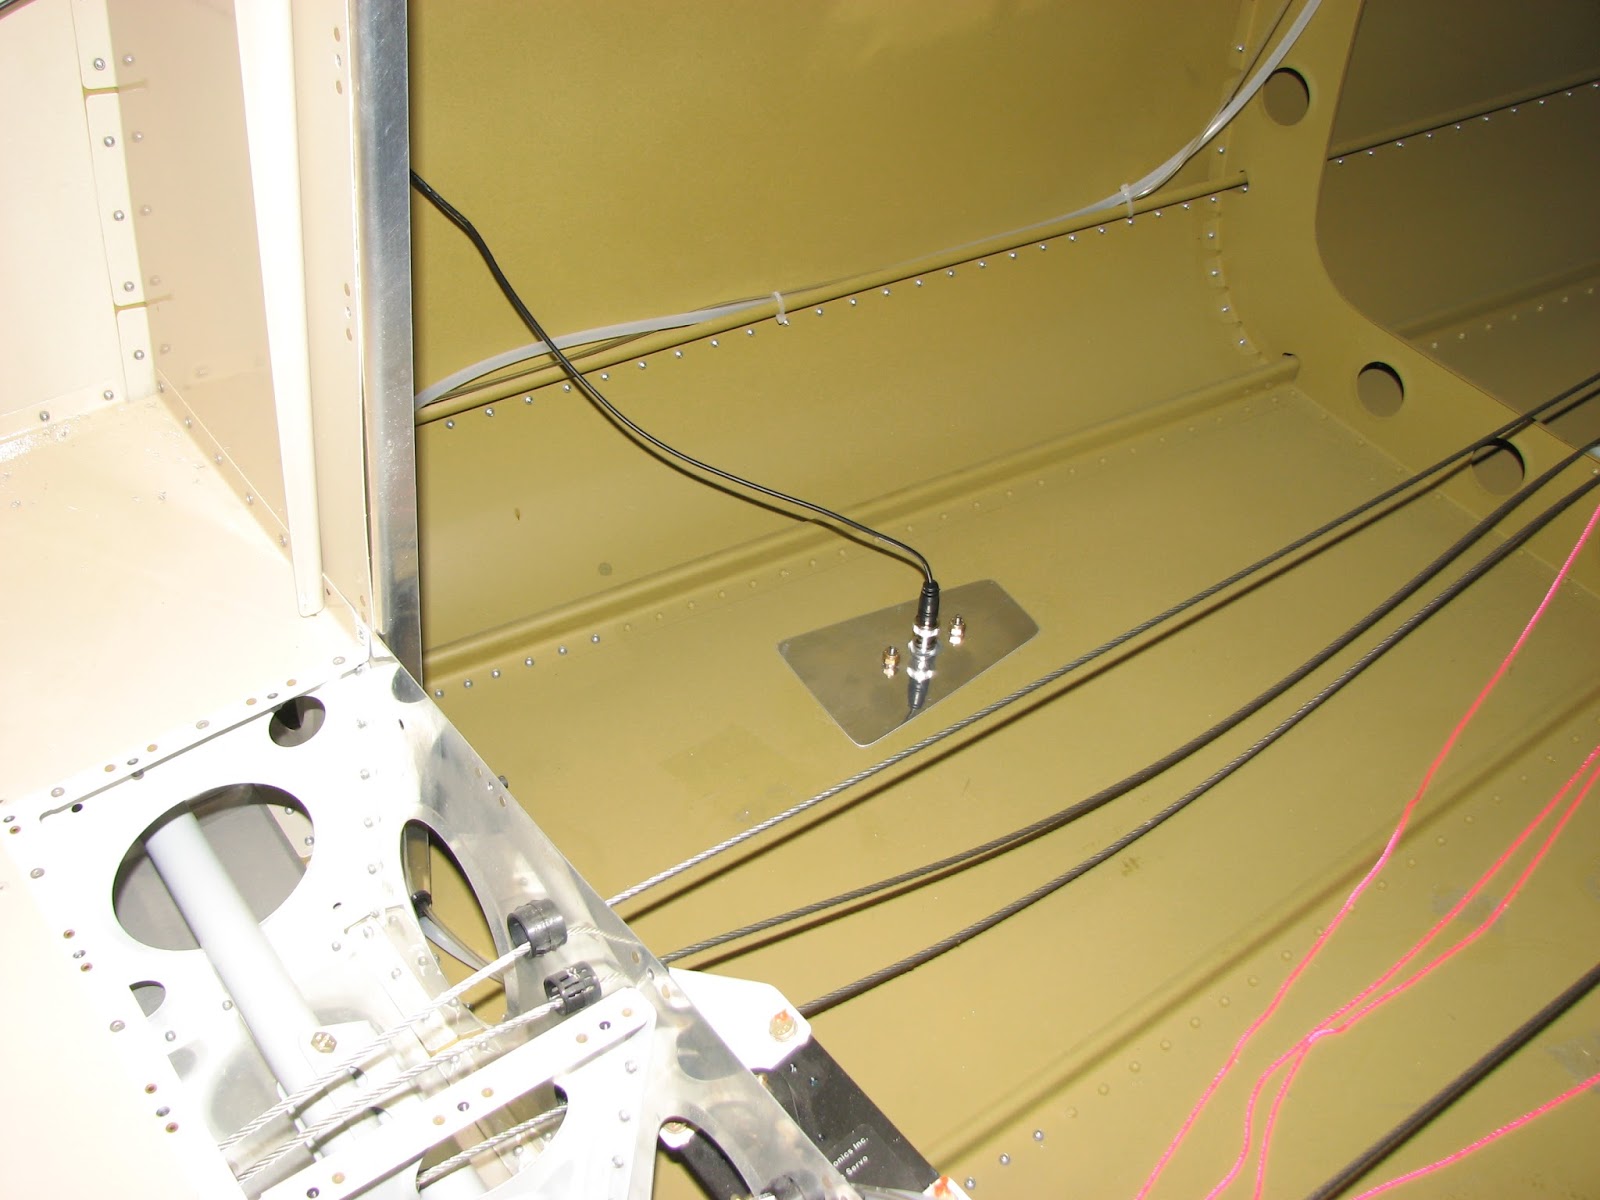
So I drilled the previously marked holes into the belly and deburred them.


The inside had to get treated with a Scotchbrite wheel to remove the primer and allow for electrical contact. I removed the primer generously around the stud holes and applied Burndy Penetrox A which is a di-electrical grease for protecting aluminum to aluminum or copper joints from oxidizing. It is a proven product with RF connections in Amateur Radio, so I thought this should be doing the job for my application.


Now, between the backplate and the primed inside of the fuselage I decided to place a star washer to promote electrical connection to the fuselage. I used the ones that are round and smooth on the outside and have their stars on the inside.
The studs would then get one star washer (regular, stars on the outside), a washer and an AN365 lock nut once they poke through the belly. For weather sealant I used the EAA recommended DAB sealant.


I needed a second hand to hold the sealant smothered antenna in place while I was trying to put all the hardware on the studs from the inside. My wife "volunteered" and did a great job.


A 2' cable is enough to connect the box to the antenna and I quickly verified that everything was still working great. By the way, the antenna position I chose is 1' aft of the bulkhead rivet line and 10" outboard from the center rivet line on the tailcone.
All the antenna cables in the lengths I needed with sometimes odd combinations of connectors I got at Cables On Demand. I really liked their quality and the prices are great, so I thought I mention that here, in case you are trying to find a source.


Then I went on to install the transponder antenna for the Passive Collision Avoidance System (PCAS) that I plan to install after certification. Putting the antenna in at this point is way easier though. I used the exact same position as with the ADSB antenna, only on the right side this time.

But first I ran the cable path, also on the right side. I could not use the smaller snap bushing as the SMA connector on the cable would just not fit, so I had to use a slightly larger size.


I found a nice spot next to the map box and allowing the antenna cable to be routed next to the POH tray. You can see the rivet holes for the outboard flange of the tray aft of the snap bushing.

The only other bushing was required on the aft bulkhead.


The cable will sit way below the top edge of the fuel tank and will not be visible once the tank is in.
The forward route was a copy of the ADSB wires, under the canopy deck.


Installation went just as well as the ADSB antenna, although I have not yet tested if the installation really works.


Here are both antennas in perfect harmony (hopefully not from an RF point of view!).


This reminds of the beautiful cars they built in the 50's.....


I did not have enough of those foam clips for the wire on the right side, so I will have to clean that up some time next week when I get more supplies.

Friday, July 19, 2013

ADSB-in Wired Up

I cut the cable to length (with a little extra to allow for easy crimping of the pins and installation of the backshell) and crimped on the Sub-D pins.


Then I inserted the pins in the connector and recorded which wire went were and installed the backshell.


The same procedure followed on the other end of the cable.


Plugging in the cable and securing it was not that easy as you might think. The thumbscrews would have helped if the thumb would have actually be able to get to the screws. After a bit of wiggling it was done anyway.


Slitted screws would have been easier than thumbscrews!
Connecting the ADSB-in box was much easier.


Temporary antenna hook-up and smoke test will follow tomorrow.

Thursday, July 18, 2013

ADSB-in Installed

I was falling behind with blogging a little. Fact is that I had worked on 3 days since the last post but I always fell short on time when it came to actually documenting the accomplishments. So here is the update now.

The ADSB-in had arrived. There was an aircraft supply store in Florida that sold it for less than the suggested retail price and the shipping was free. A no-brainer for me.


I did not have a Sub-D crimper, so the installation had to wait until Stein Air would send the required tool.
In the meanwhile I was covering myself in more fiberglass dust again as I was continuing the trimming on the wheel pants.


Yesterday, I was able to manufacture the cable for attaching the ADSB-in unit. The path for the cable started at the black box.


There was an existing hole in one of the struts that allowed a snap bushing to click and so I continued under the canopy deck on backwards.


But I did not think drilling holes in the center structure to install more snap bushings would be a good idea. So I routed the cable around it and I will have to do some magic to protect it from chafing or catching on things.


An additional snap bushing was installed to route the cable straight through the aft bulkhead.


Then I used the ADSB-in box as a drill template to drill the mounting holes in the aft bulkhead.


Followed by the installation of the box with #8 screws and lock nuts.


Now I will determine the final length for the cable, cut it and crimp on the pins on the aft end. Then I should be able to insert the pins the connectors on both sides and do a test of the unit.

The antenna installation will likely be following right thereafter.

Saturday, July 6, 2013

The Good, The Bad, And The Ugly

There was one more cable swap to do and then I deemed myself ready for upgrading the Skyview from a 3.3.2 to the latest Version 6.0.0 of the firmware. That version jump looks more impressive than it actually is. It represents merely 12 months of firmware releases as my version was last updated in July 2012.
So what about that cable swap? Van's had released a notification on August 31st of 2012 that there was a wire swap in a conversion harness (for the ones that upgraded from a D180 system to a Skyview avionics system without swapping out the wiring). The wires of the secondary SV bus system connecting the two autopilot servos had to get "unswapped", so the backup bus system would function, in the unlikely event of the primary wiring failing.
I should add that although the backup wiring was always installed (and advertised by Dynon as a safety feature) it was actually never used in pre-4.0 versions of the firmware. The obvious problem of having the bus wires swapped (rendering the backup system compromised) was never detected before version 4.0 and before upgrading it was suggested to fix this issue.
That sounded easy enough.


All I had to do was to pull the Options harness plug and swap pins 3 and 4. It would have been quickly done but I had no means of testing that the swap was necessary or correctly done as my software version at the time of change was 3.3.2 and it did not use the backup wiring.
So I decided to first upgrade the SV display to the latest 6.0.0 firmware. And as all my previous experience with Dynon products, this was neither easy no very successful. No, it was rather frustrating again.

The first step was to grab the Dynon USB stick (4GB capacity) and copy the pure firmware update file on it (the one ending in .dub). The more modern update files with a .duc ending are not recognized by the old 3.3.2 firmware.
Now I did not delete the backup files and the 3.3.2 update files from the memory stick as I did not want to lose them.
Once I started the firmware update, I got to this screen:


This validation process appeared to take forever and no progress was seen. After more than 5 minutes, I ended up in the setup menu without any change. This update did not succeed. I tried a different memory stick (1GB with almost no free space left) and now saw an error message during validation, complaining that the update file might be corrupt.
I tried another, newer memory stick with 32GB capacity and practically empty and this time it worked. It appears that the SV system is using the memory stick for some temporary storage without saying so and not correctly complaining about too little free capacity. Great! That was the Bad - referring to the title.


Once all the external devices have been updated as well, SV reboots and comes up with these slightly modified screen.


As you can see, I still have not entered an activation key for the map yet. At least I started the process today and emailed Dynon my license key and my serial number.
Now, before I went to the Network Setup to see if the bus swap was necessary, I was eager to check if my display was affected by Dynon's Service Bulletin that indicated that a series of SVs had a board in them that was prone to failure due to a manufacturing process of a sub-contractor they had used. The setup showed that my system was in hardware group 1 which was not affected by this problem. That was the Good - in reference to the title of this article.


Now for the Network Setup and the check of the secondary bus system. Avionics and Autopilot switches were in the on-position.


So, it detected a connection fault (4/8 obviously indicates the secondary bus) but the system is operational. That seems to be consistent with a backup wiring failure. So, I turned the unit off, swapped the pins and powered the SV back up.


Huh? What is that?! Still two systems with a wiring fault???
A closer look revealed that now it showed a failure with the backup system of only one servo (which makes no sense as the servo connections are spliced and share the same bus harness and plugs) but now the ADAHRS has a problem with the backup system. How weird is that?
Now, to see if the swap of the pins really affected anything with the ADAHRS (I checked the wiring diagram and it should not do anything to anything but the two servos) I switched the servos off by turning off the Autopilot switch.


Just as I thought, the ADAHRS is fine and not affected by the wiring change. Once the servos are off, the problem with the ADAHRS disappears.
Well, if you are a long-time reader of this blog you will remember that I had a similar problem with the Dynon before. Actually, it was pretty much the very same problem, only that it affected the one and only primary bus system back then. The effect was that my ADAHRS was reporting just fine while the Autopilot was off but disappeared as soon as the servos had power. Initially both servos were working fine, a few hours into debugging the problem one servo stopped working, the other one was working fine and the ADAHRS was still dead as soon as the Autopilot switch was in the on-position.
After another dreadful experience with Dynon who replaced my brand-new servo with a refurbished one (but hey, it was free!) instead of another new one that would work, the problem was fixed. Or so it seemed until today.
My very strong guess is, that no-one ever checked the servos on their backup system and either the original servo or the refurbished one is now compromising the backup bus as soon as it comes online.
The one that is least accessible in the plane at this point is the roll servo, so I would guess that this is the one that is having the problem right now. The only sure way to find out is to get to the spade connectors and unhook one servo at the time and see which one makes the ADAHRS backup system disappear. That's the one that has the issue.
However, I am completely not in the right mindset to work on this POS again. Absolutely not in this heat and given that I have my experience with Dynon and know that their overwhelming helpfulness in this matter will possibly make me go postal.
For now I accept that I have a bug in the system that should get addressed but it is working right now and there is a safe way of getting the servos off the network and that is to cut their power supply with the autopilot switch. This is safe to get the bird flying. Once it is cooler, I can then crawl into the cone and see if my guess is right. So much for the Ugly in the title...

I continued to bring the SV system to the latest versions of the maps and data files.


I had bought a bunch of very nice antennas from Delta Pop Aviation. They are very well made and Don  manufactures them himself and really knows what he is doing. They are not TSO'd but very affordable.
Here are the transponder and UAT antennas:


The UAT antenna is the one for the ADS-B receiver. You could use a transponder antenna but that is not optimal as the ADS-B frequency for the receiver is quite a bit lower than the one for the transponder and the signal will be weaker if you do not use an UAT antenna.
The additional transponder antenna will be connected to the PCAS and it should be as far away from the active transponder antenna of the RV-12 as possible.

I also manufactured two backplates for the small antennas:


I marked a good spot for the ADS-B antenna about a foot behind the aft bulkhead and close to the left side of the tailcone to keep it away from the cables in the cone and to increase the distance to the PCAS antenna which I will likely put on the opposite side.


The #8 is not a drill bit size but a screw size. These holes actually need a #19 drill bit and the center has to get opened to 1/2".

I will need a helping hand to hold the antenna in place while I attach the nuts on the studs from the inside, so I should try to get the installation of both antennas done at the same time. Also, I am out of star washers which I will need to put under the nuts.