Thursday, June 28, 2012

Fairing Work

Today I received my long #40 drill bit and put it to work. I drilled the nutplate attach rivet holes by using a #6 screw to hold the nutplates in position while drilling through the flange holes into the tailcone skin, clecoing as I progressed.
The only problem came up when I tried to dimple the upper inboard holes that are located right next to the vertical stabilizer. With the rudder horn in place, there's no room for the yoke of the squeezer to get to the skin.
I used my dimple dies for the pull riveter to get the dimples in the skin.

This problem will be more severe when the job is to rivet them in place but I had planned to take the rudder assembly off any time soon anyway. That should solve the problem then.

Done with the dimpling. One cleco each holds the nutplates in place until I can rivet them to the skins.
I expect to take the rudder assembly off tomorrow and to rivet the nutplates on in one session.

Van's cashed the check for the engine and I heard rumor that the crating department might get my engine into shipping on Friday.

Sunday, June 24, 2012

Attaching Fairing to Tail Cone

In the morning I started the task I had dreaded yesterday. Installing the stabilator yet again. I got lucky, I have to say, as the washers stayed in place this time. And I didn't have to install the counterweight nor did I have to tighten the bolts of the stabilator.


To install the fairing one has to disassemble it again. So off came the screws.


In order to hold the fairing in position you could use tape but then how would you see where you have to drill later? I chose to give it some support from below.


I slid the upper half over and attached it with the screws again.


A little bit of easy to remove blue tape held positioned the fairing assembly but how in the world was I supposed to see where to drill??? The markings didn't show through the fiberglass at all.


What I could see was part of the line outside of the fiberglass and I could see the edge of the sheet metal through the fiberglass. That was enough reconstruct the drill markings on the outside of the fairing.


It sure was a bit more effort on the lower half but mostly because it was an awkward angle to work at.


The upper holes in the lower half needed some help as the spar was resting on the lower half. I could mark the interference and remove it but only by removing the fairing and reinstalling it afterwards. I didn't want to do this if there was another way - and there was. I could tip the stabilator with one hand and remove the pressure on the fairing, allowing me to drill the upper holes without any distortions in the fiberglass. A little support structure took care of that, so I had both hands for drilling. Everything worked out fine.


I match-drilled the holes with a #27 bit and removed the stabilator and the fairing halves. When I removed the tapes I could see that I really wasn't that much off when recreating the drill pattern.


I cleaned and deburred the holes and then removed the material that still had interference with the spar or the skins. I also drilled the hole in the belly of the fairing to allow for the trim motor arm to penetrate it.


I would have continued to install the nutplates at this point if I had had an extended #40 drill bit. This is required in this step and I honestly don't see a away how to do this without one. Unfortunately, this was not part of the Avery tool kit and I had to order one.
I assume section 12 will just have to wait until the bit gets here some time next week.
In the meanwhile I might pick up on the installation of the electrical wing connectors. There's not much else to do while waiting for the engine. I might also trim the cowling if I need to burn some more time.

Saturday, June 23, 2012

Tail Fairing Finished

In the morning I turned on the A/C in the shop to cool that space down before working in there for a while.
The task this time was to attach the tabs to the fairing that would connect the upper and lower halves. First the screw holes had to get widened with a #27 drill bit.


I clecoed with #30 clecos as I went on.


Once this was done, the halves and tabs came apart and Van's asked to countersink the nutplate attach holes in those thin tabs. I chose to dimple them instead, along with dimpling the attach holes in the nutplates. Easier, faster (with a pneumatic squeezer) and stronger.


The countersinking that had to be done was for the rivets that would hold the tabs to the fiberglass. I carefully squeezed and followed Van's advice that it was ok to not seat these rivets fully to not crush the fiberglass.


I then connected the halves with the requested screws to reinforce the structure before removing the fiberglass in the slit for the trim arm.


I went outside to open up that slit and to do fine trimming. Everything went well using the usual tools, angle grinder and pneumatic die grinder and some sandpaper on a stirring stick.


At this point I had to mount the stabilator again to do the adjust for clearance before drilling the attach holes into the tailcone skin.
I chose to skip that for today as the sun came around and was shining into that area I would have had to work in for an hour or so. At 110 degrees in the shade, I just said "No" to that.

Maybe tomorrow morning ...

Thursday, June 21, 2012

More Fairing Tales

When I came home I started sanding the upper tail fairing a bit more to get a good fit for the next step. This next step was to clamp the tabs onto the lower fairing and to match drill the holes into the fiberglass.


The upper fairing got fitted within the tabs (it's easier to remove the rear ones before inserting the fairing)m got aligned and clamped to the tabs again.
Now the center hole for the screw was drilled into the upper fairing.


Then everything was supposed to get taken apart, so the tabs could get riveted to the inside of the fairing. I chose to leave the tabs attached to the lower fairing so I know which ones went were (some of them got bent to follow the shape better).
The rest of the work can be done in the shop which is very welcome with me. We had around 108 degrees F today and I could really need a break in a cool shop for a change.

Expect more of the same for tomorrow.

Wednesday, June 20, 2012

Engine Ordered

There's no stepping back now. Today I've ordered the Powerplant Kit from Van's, accompanied by a check over the full amount. An amount that I rarely ever put on a check before. This really hurts, but I'm sure the first hour flying in this baby will make up for it.
Barb @ Van's said they had 6 engines in stock when I asked last Friday, so I hope to get my kit shipped right away when they cashed the check.

When I got home I got right back to the tail fairings where I left them yesterday. Task for tonight was to tailor some blue tape strips with what will be drill marks to attach the fairings to some nutplates that have yet to be installed.


After the markings were applied to the strips they had to get attached to the tail.


I separated and deburred the reinforcement plates that will hold the nutplates where the two halves will join.


A first trial fit of the lower fairing half showed that it needed a bit more sanding in the front where it touches the tail skin. I just had to get exactly to the scribe line and just remove it. Then it fit pretty well.


The top half was put on and it showed a pretty good first fit.


However, after a while of adjusting I decided that the upper half also needed a bit more sanding on the front to just remove the scribe line. Then it fit a tad better. It was getting dark then and I had to give it up for another day.


I assume I will be tweaking this thing tomorrow and then match drill the fairings into the tail skin.

Tuesday, June 19, 2012

Tail Fairings Trimmed

I got a bit of my energy back and started doing the dirty job of fiberglass trimming. The tail fairings needed to get cut back to the scribe lines. First two large 3/4" holes had to get drilled into the lower fairing.


I have recently resorted to a really brutal tool that gets the rough trimming done in no time. You better watch out what you cut though because one stupid moment could ruin the whole part.


The pneumatic angle grinder was used to do the fine trimming.


And the Dremel and some elbow grease finished the job. For now that is, as the final trimming will be done when the two parts can actually get attached to the tailcone.


Expect more work on the tail fairings...

Monday, June 18, 2012

Not Much Energy

I felt a bit lazy tonight and didn't get anything done but to pull the empennage fairings from the big Finish Kit box, clean them and enhance the scribe lines in preparation for the big trimming session.


Sunday, June 17, 2012

Trimming the Canopy Skirt - part 2

First thing in the morning was to pull out the existing elevator cables and to measure them in comparison to the new ones that had arrived on Friday. It turned out that the new pair was longer than both old ones and I think that should get me really well adjusted on the turnbuckles. I decided to keep the new pair and send back the old one.
So I pulled the new cables in and routed them under the tank.


I've also decided to leave the strings in the tailcone until right before certification. It's easy enough to cut them and pull the string loops out, but it would be a major PITA to get these routed again after taking them out too soon.

Next I covered up the instrument panel so I could put the canopy on for fitting the skirt.


This was the first time since the installation of the avionics that all the screws were in and I thought I'd take a closer look.


I think the silver screws look good on the flat black. However, the upper curved row of screws won't be visible because of the forward tube of the canopy sitting right in front of them.

The first fit showed that I needed to trim quite a bit more in the front to even be able to start tipping the canopy. So back off, more cutting and back on. This is the second trial.


The solid silver area was about to get removed.


At this point I stopped the session as it was getting to a 100F with high humidity as the monsoons have arrived in Tucson. I now have to slow down on the trimming to not remove too much at once. I hope I can do some more trimming during the week.

The tailcone stub needs to get done and the electrical wing connectors have to get installed. Both jobs I can do on my own if there's no help available for working on the canopy.
Also, the money for the engine is on the way to the checking account and I hope to be able to send Van's the order along with the check some time this week.

Saturday, June 16, 2012

Repairs, Repairs, ...

On Friday, all the outstanding items were coming in. Van's sent the additional set of elevator cables for matching the best pair, Dynon sent the shitty looking refurbished ADAHRS unit, a 2200 serial number with oxidization on the brass fittings, and I got my little oiler can to try to bleed the brakes the right way.

I started with the ADAHRS. Before taking my new one out, I wanted to run it first and see that the error still existed.


So I ran the unit and to my big surprise the OAT showed right up.


Yes, clearly early in the morning and working. I don't believe in magical healing, and I know what I saw before, so I was wondering what was different. Well, I ran the system off the power supply this time as the backup battery of the SV had let me down after two minutes into running the system. And it was a pretty cool morning for Tucson.
I decided to let the system run and prepare the work on the brakes. I had decided to bleed the brakes from the bottom up as the vacuum method was sucking air through the bleeding valve along with the oil. And because Don told me so :-)

While I was preparing that work and greeting the locals...


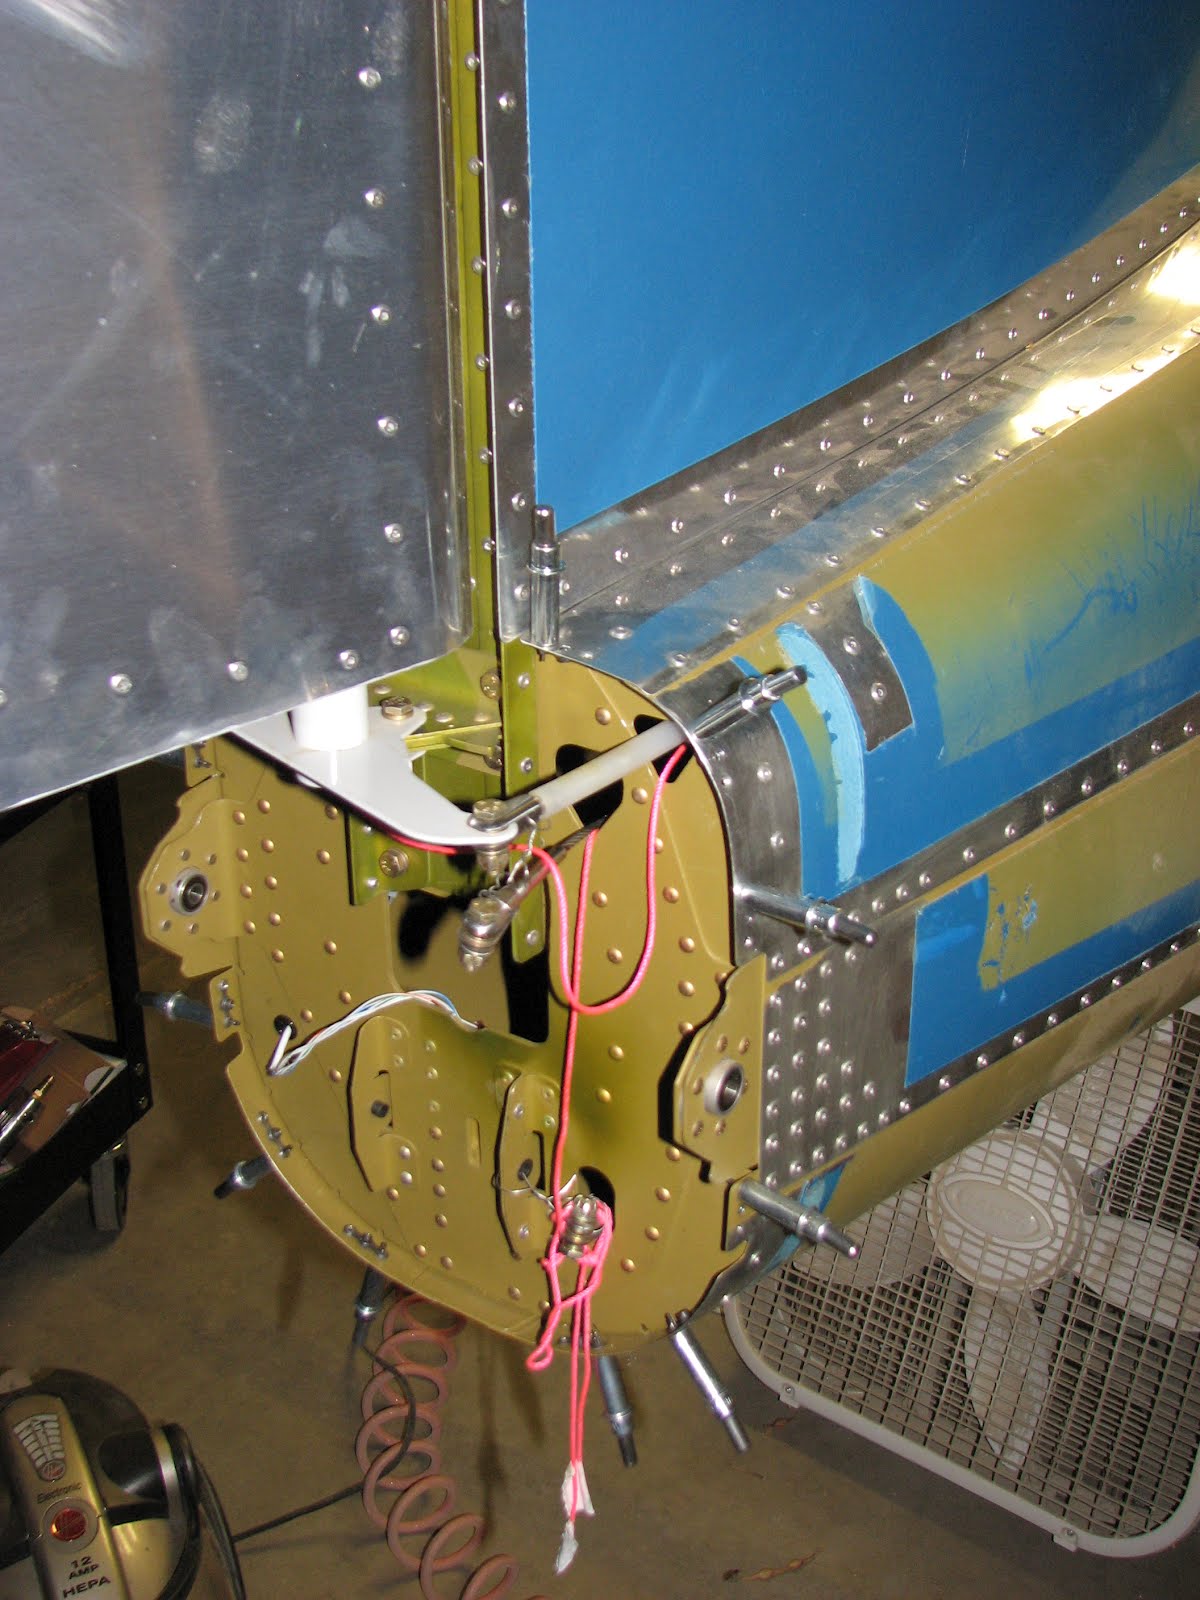
The OAT suddenly failed and it failed consistently. Fiddling with the plug didn't do anything just like before. It was about half an hour into continuous operation. I decided to crawl into the tailcone and see how warm the ADAHRS had become and to hook up the refurbished one to see if that was doing any better.
Yes, the failing ADAHRS was significantly warm and playing around with the plug didn't change anything. This indicates that the PCB has a crack or a back solder joint which disconnects the OAT due to thermal changes.
I hooked up the refurbished unit and connected it to the bus and the OAT probe.


Powering up the system brought he OAT reading back right away. Well, my unit had done the same so I kept the refurbished one running while re-bleeding the brakes.


Bleeding the brakes from below is much more effective and it does show that the valve leaks a bit when open as it also allows a little amount of oil to bypass it and leak on the hose. Getting the air out of the main cylinders was a bit of a struggle until we found out that all you have to do is to continuously push oil through the system while a second person is changing the attitude of that cylinder a bit by moving the rudder. That seems to allow the air to escape more easily on the top and then to get flushed into the brake reservoir.
It took a while but finally the system was clean of any air and the brakes have a rock solid feeling now!


The oiler can I used came from Amazon, it has a fixed nozzle that fits perfectly into a silicone tubing of 1/4" OD, which also perfectly fits onto the bleeding nozzle. It's not big enough to hold enough oil for flushing one side without refilling once, so maybe there's something better out there.


It's the brown can in the center of the picture if it wasn't obvious and the following picture shows the stuff I used to fill the system. It's fully synthetic brake fluid (MIL-H-83282).


By then the OAT was still showing on the SV display and this was a 1.5 hours test. So I decided to get my shiny but broken one out and the crappy looking but working unit in. I did it all working from inside the tailcone, although I considered to drill out the rivets again and to do all the mounting outside. However, I had to disconnect and re-connect the pressure lines and that had to be done from inside the cone anyway. That's why I decided to do it all from inside.


It went in nicely and everything hooked up ok. More importantly everything seemed to work fine when the SV came up. I didn't have a chance to test the airspeed indication yet but I consider ok for now - until proven broken.

So, again, my Dynon equipment out of the box had a failure rate of 33.3% as a 1/3 of the devices were broken before being used. There's no way that Dynon does a reasonable quality control at this time. With important equipment like avionics, even experimental, I just require that the devices are all tested for 24 hours under extreme conditions. Which means high humidity, and at maximum and minimum allowed ambient temperatures. This is standard practices for electronic equipment which in a case of a failure can endanger human life.
If there had been any noteworthy testing occurred with my servo and my ADAHRS, both problems should have been detected and I wouldn't have had these issues and a lot of lost time and faith.
What is even more irritating, is the lack of responsibility and the complete absence of interest in listening to my complaints that has been shown by Dynon. This is certainly not the attitude of a long-time market leader.

Outlook: I couldn't check the cable lengths today and I also didn't trial fit the canopy. So as a result these tasks are scheduled for tomorrow now.