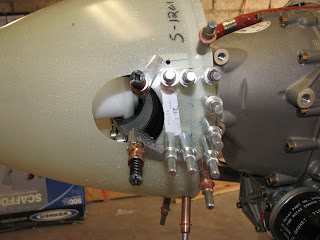
The first step in today's work was to adjust the spinner on the backplate in a way that would keep the pitot tube centered while the prop is turning. This required the spinner to be clamped to the backplate.
As a reference for the pitot tube's start position I assembled a setup of a carpenter angle and a sawhorse and a clamp.
This allowed to position the upper left corner right in the anticipated center of rotation.
I needed 2 or 3 slight adjustments before I was satisfied with the fit. The next step was to drill and cleco the spinner in place.
I used a #40 plexiglass drill bit to position the hole accurately in the fiberglass and then used a #30 drill bit to go through the fiberglass and the metal. That worked great and the holes really lined up well.
Now that the spinner was in its final position, Van's had me sand the back down to be flush with the backplate. For this task I marked the overlap with a felt pen and removed the spinner to sand the 2 millimeters with a belt sander. The spinner was re-clecoed to the backplate and the rest of the overlap then removed with a sanding block.
It was time for the cardinal fitting job. Attaching the gap filler plates to the spinner to cover the hole behind the prop blades. First, the approximate cut had to be transferred from a template on to the actual part.
I used the bandsaw to do a rough cut of the piece that had to be removed.
Then I used the Dremel tool and sandpaper on a piece of 1" pipe to fine trim the parts.
The last step of the preparation was to lay out a drill pattern for the 4 rivet holes that were about to get match-drilled into the backplate.
Then the propeller had to get removed to allow for access to the delicate area for installing the gap fillers. The front plate and the front half of the hub were removed and the spinner put back on.
Clamping on the pieces was up next. Note the slight overlap on the back. This is because the cutouts had not been trimmer yet but also to adjust for a reasonable gap to the spinner - taking into account that this will all get painted at some point.
Again, I used the plexiglass bit to start the hole into the fiberglass. It's easy to position and hold it with its very pointy tip.
And then it was final drilled with the #30 bit.
The opposite side when just as well.
The next step startled me at first, because it was requesting a piece of material that I could not recall to have seen before. Well, it was one of the last few unused pieces of metal in a tiny corner on my shelves.
This one had to get bent to follow the spinners shape (I used the pint can of brake fluid) and then marked to cut off 4 pieces of 1.25" each.
When you do this step, please be smarter than me and put the cut markings on the inside of the curve instead of on the outside as I did. It is much easier to cut with a bandsaw that way.
These pieces had to get attach to the gap filler. Hole measurements marked and drilled.
After drilling, the pieces were ground back to follow the shape of the prop cutouts and then polished smooth. Then the whole assembler was attached to the backplate again and the spinner match-drilled for a #19 hole for the screws that will connect the parts.
Now that all the match-drilling had been done, the last step before removal of the spinner was to final drill all screw holes to #19. This included the front plate that we had removed before when removing the prop blades. And finally everything had to come off.
And this is not even all that has to come off. The back of the hub as well as the backplate itself will also have to come off to install the nutplates before everything will be installed again.
And just when I was cleaning up and was about to close shop the mail dropped off a package from Van's.
These are the parts for the next Service Bulletin, the one that reinforces the brace for the battery and oil tank. Good timing!
Not that I am looking forward to do this extra job but at least I won't have to wait for parts before I can finish this step.


No comments:
Post a Comment