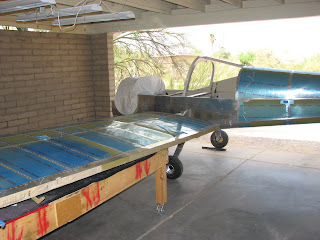
Elizabeth and I had a pretty packed schedule for today and started early. in the morning. The plan was to fit the wings, install the flaperons, match drill the torque arms and tubes and get the wings back in the cradle, all in one work session, and make it to a BBQ in the early evening. Challenging!
I had prepared quite a bit the day before and finished the preparation in the morning with the larger items. Moving the cradle to the car port was one of them.
I didn't find any hints in the plan but you should be aware that there is a distinct order in which you should put the wings on. You start with the left one and follow with the right one. Otherwise you cannot secure them with the spar pins halfway in. The left spar is in front of the right one and the spar pin would block the insertion of the next wing if you'd start with the right one.
So, we placed the right wing outside of the car port as the access to the inside of the carport is rather tight with the fuselage blocking most of it, sitting sideways.
The left wing was put on the caster equipped work bench.
The reason why we put the right wing in a covered area with walls surrounding it, making the access a bit more complicated than just placing it out in the open driveway, was the rather gusty winds we had early in the morning. I didn't want the wing to get airborne without the rest of the plane attached to it.
The wing had been stored outside for about a year and had not been closely looked for that time. An inspection revealed some evidence that we have a female Bobcat around that marked the wing as its property. Alclad DOES corrode when exposed to urine! This photo was taken after I cleaned it off, so the spots you see is the corrosion. This will have to get treated before painting.
We positioned the fuselage to receive the wings. The outside wheel was sitting a bit more than an inch low and would get shimmed later to get the wings leveled.
The left wing got started off the table and was ready to get slid in.
It almost went in all the way. Almost! Then we had some interference with inside of the spar bracket. A common problem seen by other builders before, so I was prepared and had my Dremel tool ready. I trimmed off about a 1/8" which allowed for some 1/16" clearance between the bracket and the spar. I did this on both sides without even trying the right wing first. It turned out to be the same amount of clearance on both sides, so the right side needed just as much as the left one did.
The green rag was pushed in to keep the metal chips out. Here's a picture of the bracket after trimming.
Remember to grease the spar pins and the inside of the bushings before you push the pins in the first time. I used Boelube grease and a rubber mallet to drive them in. They did not put up a fight but the clearance between wings skin and fuselage skin is less than the required minimum of 1/8" all around and needs full trimming. I decided quickly that I wouldn't touch that before the bird will head for the paint shop which won't happen before certification. For the smaller gap will actually help with sealing it temporarily.
The left wing didn't give us too much trouble and with the bracket prepared on the right side the right wing went in even easier.
The clearance inside was just perfect and the pins went in fine. I put the pins in with the sides swapped for easier access during fitting. Usually the release knob should be facing outboards so it couldn't get activated by accident.
After a quick lunch I put out the flaperons and washed a year worth of dust off.
We pulled the wings back out for about half a foot and rested the wing tip on a saw horse (should have been a foot to make things easier!) and installed the flaperons.
To make things easier for Elizabeth I rested the flaperon tips on a saw horse so she wouldn't have to hold the trailing edge during installation.
With the flaperons installed and the outboard edges securely clamped to the wingtips the torque tube system was ready to get its match drilling.
I went back to the shop and fabricated the required .063" spacers and hopped in the back of the cockpit to do the clamping and drilling.
Now the bad news was that everything will have to come out to finish the match drilling on the opposite sides (from the belly side of the fuselage). This cannot be done inside the plane and has to happen on a work bench.
But before we took all apart, I just had to jump in the (yet missing) pilot seat and make some funny engine noises!!!
We pulled everything apart and stored the wings back in the cradle with the flaperons installed and clamped to the wingtips. Then we rolled the fuselage back in its previous position.
And we still made it to the BBQ too! What a great day!
Tomorrow I will have to remove the torque arms from the fuselage. The tubes came out when the wings were pulled, so that wasn't an issue. Once they are all drilled and deburred and trimmed to correct length, the system will get installed again and then bolted together. I might just call it a day then and enjoy the rest of the Sunday on my last vacation day before heading back to work on Monday...
Saturday, June 2, 2012
Subscribe to:
Post Comments (Atom)


No comments:
Post a Comment