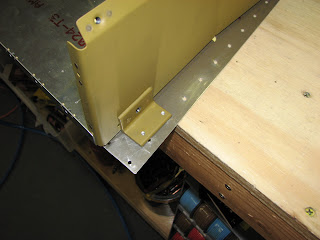
A lot of extra clamping and screwing screws into nutplates fixed that but also took away a lot of time.

The result's looking pretty fine though, I think.
The last step before the big panel installation was to match-drill the two angles to their respective holes with the panel base (and the longerons later). And you know by now that when I start like that there must have been something wrong with iy. And that's right.
Here you see the ribs clecoed to the base before match-drilling.

Everything aligned very easily and nicely.
After drilling however, the two angles look different:

This is the left side and the space around the freshly drilled holes looks sufficient.

On the right side it's easy to see how the holes are displaced and forward one is too close to the edge. Checking everything though shows that these angles are right where they are supposed to be and so are the ribs, there's nothing wrong with the base either and the angles length is identical and right down to specs.
I wonder if anybody else has seen this.
As everything was to specs I decided to assume that Van's knows about this and doesn't care and so I decided to follow their lead on this one and let it go.
Next steps were to "furnish" the empty panel base with steel doublers for the engine mount, some angles to route the wiring and the center frames for the center panel section. I left out the latter and installed the first two. Reason is that the panel frames stick out quite far and are just attached with two narrow seated rivets, having the potential to damage the panel base if caught by a tarp or similar. As I won't put the panel for a while as I'm waiting for the SkyView, I thought this to be the better option to hold off on these frames.
So I put the panel base on the longerons, clecoed everything else in place and started a little riveting frenzy. Soon thereafter the panel base looked like this:


Page 29-04 is almost completed, just need to seal the lower corner between the panel base and the canopy ribs with fuel tank sealant. At that time I will also touch up a few spots that I missed with the firewall sealant and complete that task as well.
I forgot to mention yesterday that I ordered two more kits for the -12. It's the wheel fairings although they are ridiculously expensive and the RV-12 AP SERVO KIT. I write this in all caps as this is the official name in Van's database and in case you want to order it as well. It's not officially available in the web store. It is the servo kit for the autopilot but without the AP74 unit that is only usable with the Dynon D180 FlightDek. As I am waiting for the SkyView, this unit will be obsolete and as it costs about 2/3 of the wheel fairings kit, it's not exactly cheap.
Now is the best time to install the servos for the autopilot though and I don't want to miss that opportunity of saving me some grief and back-pain.


Thanks for posting your experience. I ran into the same problem with the rivet hole clearance on the strut attach angles. Since the edge clearance on my parts don't meet the minimum set out in the Aircraft Standards handbook, I'm planning on making new ones that have enough edge clearance.
ReplyDeletewww.aviationstop.com